Tuesday, December 21, 2010

Caps in Data Entry

Here is a companion post to a previous post regarding Data Entry Questions. Some of you have reported that you are requested by your boss/supervisor/office manager to type in all capital letters when entering patient information. Of course, always follow such instructions!

However, for those of you who are not required to do this, there are advantages to following regular capitalization.

Take a look at these two addresses, and see which you like reading better:

JOHN Q. SOMEBODY
1357 PARALLEL UNIVERSE LANE
HARRISTOWNVILLE, NY 13367

John Q. Somebody
1357 Parallel Universe Lane
Harristownville, NY 13367

Most people find that the second address is more enjoyable to read. The difference seems pretty minor until you come across a longer entry in the patient information which is in all caps, for example:

PATIENT REQUIRES A TRANSLATOR FOR ITALIAN. REQUESTS CATHOLIC PRIEST TO BE PRESENT BEFORE UNDERGOING ANY MAJOR PROCEDURE.
Patient requires a translator for Italian. Requests Catholic Priest to be present before undergoing any major procedure.
Again, most people would prefer to read the second entry. This makes reports, printouts, and patient data more pleasant to read. It can also help in data entry fields allowing variable fonts, as shown in a previous blog post, Data Entry Questions.

Thursday, December 16, 2010

Print Ref. Provider Labels

Do you have any questions about the Label processing procedures in GUI? To understand the way GUI typically handles labels, here is a demonstration of the Referring Provider labels. There are two main ways available to help you manage Referring Provider labels.

For the first method, navigate to Settings > People & Places > Referring Providers. Here, search/select the Referring Provider, and click on the Labels/Forms button:

(Click any image to enlarge.)

The Labels/Forms screen appears. Now you have the option to select which type of label you want to print and how many labels you want of that type. If you want labels for only one referring provider, click Print Now. Otherwise, continue to add each referring provider by using the Save and Print Later button. (The more Referring Providers you need to add, the more helpful the Save Defaults buttonbecomes.) When you have added the last one, click Save and Open Label Manager:


(Note: An alternative to the Save and Open Label Manager option is to click Save and Print Later again, and when you are ready, open Daily Activity > Label Manager at a later time. The Referring Provider Labels you have selected for printing will be stored here. It is also important to note that the Label Manager is shared between everyone in your practice. As a general rule, only select and print the labels you added to the Label Manager.)

A more comprehensive method available to you is found in Reports > Practice Management > Ref Prov/Patient/Charge report.  Simply set the parameters to print labels for the criteria you select. For example, to print address labels for every referring provider active this year, change the Service Dates From field to the beginning of the year, (01/01/2010,) choose a report type and select the desired template in the Template 1 field:


A report will print, according to the options you selected. Following the report, the labels will open, and a printer selection screen will appear. Print out the labels to your printer and you are done.

Tuesday, November 16, 2010

Moving Around in Rexpert

When you enter certain screens, some fields will show default values, such as the Payor in Payment Entry. Sometimes you will want a different value in the field. Some people accomplish this by selecting the old value with the mouse and hitting the delete key before typing in the new value.

Here is a quick tip to help you work faster in this situation. As you are working through the fields on a screen, press Tab to move to the next one. This is faster than pointing with the mouse and clicking into the field anyway, but it is especially helpful when you need to clear out a default entry.

When you Tab into a field, the entire entry becomes highlighted, allowing you to replace it automatically with the first keystroke of the new value. (You can use the Spacebar if you want the new value to be blank.)

(Click to enlarge.)

If you ever need to search/select an entry from a lookup, the entry in the field doesn't matter anyway. When you press F2 or click on the Lookup button and choose an entry, it will bring the new entry back into the field, so you don't need to spend any time clearing out the field first.

So why are there defaults if you are going to have to change them? Because it doesn't take any more time to clear out an entry than it does to type in a new one, and the default entry is often the one you will need anyway. Having it there can save a little of your time, especially in screens you use everyday.

Thursday, November 11, 2010

More Space with Lower Case

Thank you to all of you who continue to use the feedback button to ask us your questions! One question that has been asked several times now is regarding data entry on certain screens with long fill-in fields. Often, there appears to be enough space for you to continue to type in information when suddenly you are stopped short.

One place this may happen is on the Billing tab of Account Registration. Near the bottom of the screen there is a field which allows you to enter in a Message to Print on a single client's Personal Statements. Let's say that this week, Mrs. Abreu came in for her scheduled appointment with a big batch of homemade cupcakes for the staff. As a way of making sure that she feels appreciated, you decide to not only send her a thank-you card right away, but to also include a note on her statement showing that your practice is one that truly cares about its patients.

You start typing and find that you cannot continue typing even though there is room left on the screen:

(Click any image to enlarge.)

You change your message until you find a way to say what you want in the space available:


This can seem frustrating at times, but it is helpful to understand why this happens. In CHUI, the font that is used is a "fixed width" font. Because of this, a capital "M" takes up the same amount of space on the screen as a lowercase "i". If you create a fill-in field that is 10 characters long in CHUI, "iiiiiiiiii" is just as wide as "MMMMMMMMMM".

In GUI, (and the internet browser you are currently using) the font is "variable width." This is why the above set of 10 "i"s in a row takes up so much less space than the set of 10 "M"s in a row. When GVT designs a screen, many factors are used to determine the layout that will be the very easiest to use. One factor is the amount of room available for a field. If there is enough room on the screen, the field is designed to show one of the largest possible entries - all capital "M"s:


On this screen, there is no more room available to increase the size of the Message to Print field, and it still can't display all of the capital "M"s that the field is capable of holding. This is because on the printed hardcopy of the Personal Statement, there is only enough room for 60 characters of a fixed width font. In most of the printed reports made using Rexpert, (Crystal Reports being the exception,) a fixed width font is used.

So, why does GVT use the variable width font on the screen if it leads to all of this switching back and forth? If fixed width was good enough for CHUI, why not use it in GUI? Well, compare these two sentences:

Most people agree that variable width fonts are more pleasant to read and are easier on the eyes.

The above statement is true. GVT uses these fonts because most people would prefer to read them. It may be a bit complicated, but hopefully this explanation helps clear up some of the confusion surrounding fill-in fields.

Tuesday, October 26, 2010

Hidden Info in Financial Details

The Financial Details tab of Account Inquiry has a lot of information in the browse. This means that some of the columns will contain more information than they can display. For instance, it may only display a part of the Description, as shown here:

(Click on any image to enlarge.)

In this case, the browse columns can be adjusted to any width you like. For the screen shown above, the only information getting cut off is in the Description field. To fix this, aim your cursor (pointer) directly over the vertical black line directly in between the two column headings (Description and Payor), click and hold the mouse, and drag to the right until the entire Description is visible:


Note that the last column, Substatus, has been extended beyond the side of the visible portion of the browse. To view this column, use the scroll bar that appears at the bottom of the browse:


Tuesday, October 19, 2010

How to Use Charge Change

Several similar questions have been submitted recently via the feedback button regarding the use of the Charge Change/Delete feature of Account Inquiry. To access this feature, right-click on a charge while in Account Inquiry:

(Click any image to enlarge.)

The Charge Change/Delete screen appears. You will notice that in the upper right-hand corner of the screen, the "Starting Date" field is set for you, and it is not possible to change it:

This is because Charge Change/Delete is designed to be used for only one charge at a time. To edit multiple charges, click on the Charge Entry quick access button on the top of the screen. Enter the date of the earliest charge you would like to modify into the "Starting Date" field, and now you can edit multiple charges one right after another:

Thursday, October 14, 2010

Electronic Checks

In the past, when you received an electronic payment file containing multiple checks, you couldn't be sure when the funds from the checks would become available to your practice. Since you should not post a check until it has been deposited, an electronic file would contain the information regarding posted and unposted checks. When a check did arrive which needed to be posted, you had to identify both the file and the check.

GVT has added a major improvement for Electronic Payment Posting. Now, if you have a check that is ready to post, but don't necessarily know what payment file it is for, you can opt to simply enter the check number. Upon opening Patients > Payment Posting > Electronic Payment Posting, you will see two options at the top:

(Click any image to enlarge.)

Now, select the "Check Number" option and enter in the Check Number:


Press "Tab" on your keyboard or use the cursor to click inside the display area. Rexpert will find the check and display the file, payor and check amount. The displayed information can be used as a visual reference to verify that you have retrieved the correct check and continue the posting process.

Tuesday, October 5, 2010

Typing Shortcuts: Take 2

A user submitted question: "I post payments by using the keyboard rather than the mouse. When posting payments with a credit on the account there is the option to either Go To Refunds or Continue With Check. Can you make Continue With Check automatically selected so all I have to do is use the enter key instead of the mouse?"

This is a common type of question, as many people find that it is easier to quickly accomplish tasks by navigating with the keyboard instead of constantly moving from the keyboard to the mouse multiple times for every action. For any screen which comes up with buttons at the bottom, you can just press the underlined character of the button you want. So in this case, press the "c" key on your keyboard for Continue With Check:


Friday, October 1, 2010

Patient Privacy on Statements

Submitted via the Contact Us button: "I had a patient call me because she was concerned that her complete social security number prints on her statements (she has Medicare). Is there a way to black part of and/or eliminate the social on the patient statements?"

Medicare uses patient social security numbers as policy numbers, meaning that the Payor settings will need to be changed. To do this, go to Settings > People and Places > Payors:

(Click any image to enlarge.)

Note: Not all users have the necessary permissions to implement this fix, so if the menu option is grayed out, ask your system administrator or client support representative to follow these steps.

Select the Medicare payor. (If you don't know how to quickly navigate to the correct payor, visit the Payor Searching blog post.) Once you have selected the payor, press the Edit button. Click on the Payor Options 2 tab, and place a check mark in the box labeled Do not print policy # or group # on personal statements:


After checking the box, Save and Exit the screen. No policy numbers should print on future statements for this payor. If you have several Medicare payors, you will have to do this process for each one. If a policy number does continue to print, please contact client services, since your personal statement logic may need to be updated.

Tuesday, September 28, 2010

HIPAA 5010: Plan/Timeline

HIPAA 5010 is an enhanced electronic claims transaction standard. Federal mandate requires all healthcare electronic claim submitters to change from the currently used HIPAA 4010 format to HIPAA 5010 by January 1, 2012.

GVT's Implementation Plan and Timeline:
  • May-Aug 2010 - GVT staff participated in monthly National Provider Calls (phone seminars) conducted by Medicare on the 5010 changes. 
  • Sept-Oct 2010 - GVT software design of 5010 requirements.
Medicare Implementation (direct submissions for PA, NJ):
  • Jan-May 2011
    1. GVT begins testing with Medicare. (Medicare begins to accept tests January 1.)
    2. First wave of GVT practices switch over to 5010 claims.
    3. Remaining GVT practices move over to 5010.
Highmark Blue Shield implementation:
  • Apr-May 2011
    1. GVT begins testing with Highmark Blue Shield.
  • June 2011
    1. First GVT practice switches over to 5010 claims on  June 8,2011.
    2. Additional practices to switch  in week of June 1
  • July 2011        
  •      Remaining practices to switch to 5010.

Emdeon implementation:
  • May-Jun 2011
    1. GVT begins testing with Emdeon.
    2. First wave of GVT practices switch over to 5010 claims.
    3. Remaining GVT practices move over to 5010.
Gateway EDI implementation:
  • Jun 2011
    1. GVT begins testing with Gateway.
    2. First wave of GVT practices switch over to 5010 claims.
    3. Remaining GVT practices move over to 5010.
Medicare Palmetto (Ohio, Delaware, California); PA Medicaid:
  • Jul-Sep 2011
    1. GVT begins testing with Medicare and Medicaid.
    2. First wave of GVT practices switch over to 5010 claims.
    3. Remaining GVT practices move over to 5010.
Aultcare, Carecore, CBH, Magellan, BHSI:
  • Sep-Oct 2011
    1. GVT begins testing with each payor.
    2. When ready, each practice will be moved to 5010.


What will your practice need to do?
It is expected that there will be some Rexpert master table changes required to implement 5010. In 2011, GVT will contact you with directions for these changes and to prepare you for the transition.

Thursday, September 23, 2010

Info on Reconciliation Report

Jim Knott from Client Services has some information to share today. There are times when the reconciliation file offers too little information on a refund requested. To get the complete information, you will need to look at the raw data of the file.

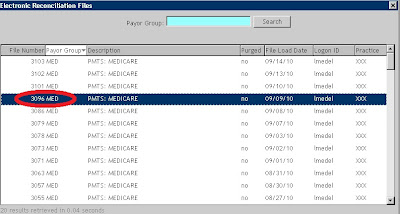
Start out by following the menu path: Patients > Payment Posting > Electronic Reconciliation Rept. Browse until you see the report for the date needed, or press the Get All button and then sort by File Load Date, and find the date you need. Now you can get the File Number:


(Click on any image to enlarge.)

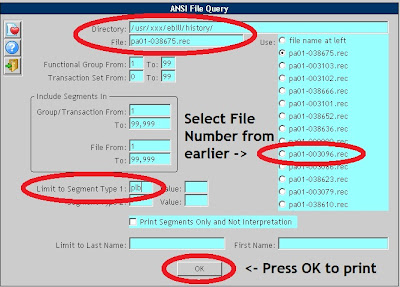
Once you have the File Number (it is a good idea to write it down), navigate to Billing > Electronic > Electronic Support> ANSI File Query. The module opens with the default .clm files loaded on the right of the screen. However, since you need the reconciliation file, change the Directory from the default of "/usr/***/ebill/history/" (*** - your practice code) to "/usr/YYY/ebill/history". (For some users, it will be "/usr/XXX/ebill/history".) Now, the .rec files will load on the right hand side. Select from the available .rec files the File Number of the reconciliation file you found earlier:


In the field Limit to Segment Type 1, type "plb" and hit the OK button. You are now given the opportunity to choose a printer to print the information. The printout will display all available information regarding the reconciliation file:


(Click above to enlarge printout.)

Thursday, September 16, 2010

Search by Policy Number

In response to a question submitted via the Contact Us button, and now also displayed on the "Rexpert User Forum" page here at Rexpert Experience, here is the description of how to search for a patient in Account Registration by Policy Number.

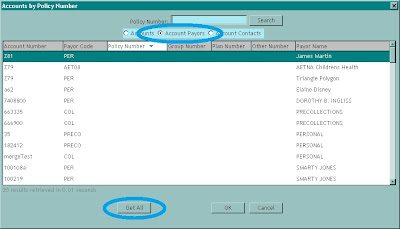
First, enter the Account Registration lookup, and notice the options immediately below the search field at the top of the screen. The default selection is Accounts. Select Account Payors and the screen will change:


(Click on any image to enlarge.)

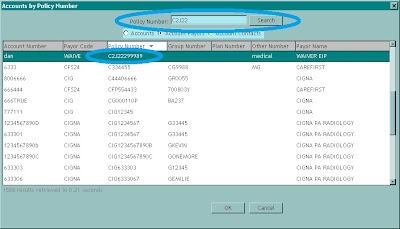
The default search option now changes to Policy Number. Enter the Policy Number and press the Search button:


This is how to search by Policy Number. GVT is constantly receiving new ideas and suggestions regarding ease-of-use and program options, and implementing new features regularly. It is a good idea every so often to pause, take a fresh look at the screens you are using, and see if any changes/options are available that will streamline your usage and make your life easier.

And remember, continue submitting those ideas via the forum and the Contact Us button, for your chance to help improve Rexpert and maybe win some cash! We love to hear from you.

Monday, September 13, 2010

How to Use the Wait List

There have been a few questions recently about the Wait List feature of the Scheduler, so here is a short demonstration of the two most common ways that the Wait List is used.

Situation 1: Mr. Edwards came in with moderately severe shoulder pains today (Monday), but Dr. Flemming, his primary provider, has no appointments available until Thursday. This is where the Wait List comes in handy.

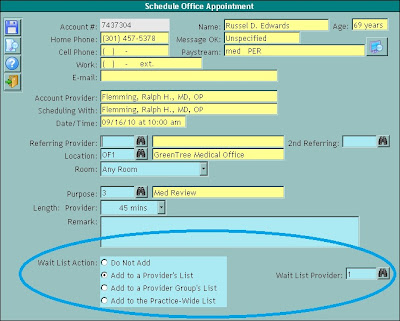
After talking with Mr. Edwards, you decide to schedule him for an appointment on Thursday, but you will also place him on the Wait List in case a spot opens up earlier in the week. While scheduling the appointment, Mr. Edwards indicates that he would prefer to see only Dr. Flemming. Because of this, you choose the Add to a Provider's List option:


(Click any image to enlarge.)

(Note: Mr. Edwards could have been added to a Provider Group Wait List or the Wait List for the entire Practice, and he would likely get an appointment much earlier in the week.)

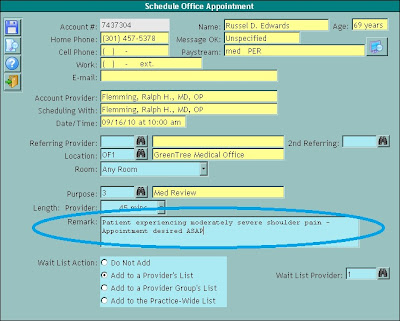
Now comes one of the most important parts of the process: the Remark. Leave a remark with any valid information regarding the appointment and the requirements for getting off of the Wait List:


This concludes the first commonly used function of the Wait List. When the above appointment is scheduled, Mr. Edwards is automatically added to the Wait List. We'll stay with Mr. Edwards to demonstrate the other most common use of the Wait List.

Situation 2: On Tuesday, another patient calls in and cancels their Wednesday morning appointment with Dr. Flemming. As soon as the appointment is cancelled in the scheduler, an information message appears:


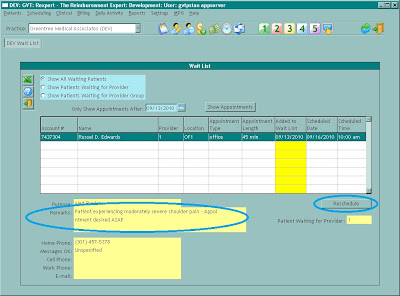
After selecting OK, the Wait List screen appears. Currently, there is only one eligible appointment to fill in the space opened up by the cancelled appointment, and so after reviewing the Remarks and seeing that the appointment requirements match the available slot, you press Reschedule:


This brings up another information message:


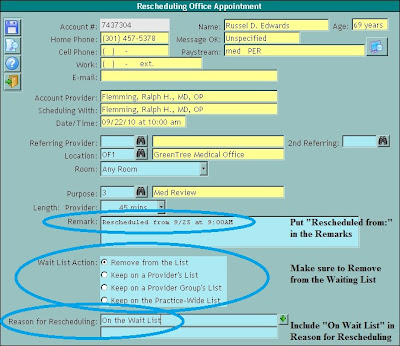
From this point on, you simply follow the steps to reschedule an appointment by dragging and dropping the Reschedule icon into the proper slot on the Scheduler. Once you have selected a slot, the Rescheduling Office Appointment window appears. Make sure to Remove from Waiting List (default) if Mr. Edwards is satisfied with the newly scheduled appointment:


While there are other possible uses, this covers the majority of situations requiring the Wait List. Please comment below if you have questions or comments.

Tuesday, August 17, 2010

Video on Payor Searches

Hello again everyone, it's time for another blog post from GVT. This time it's about a video tutorial! You can head on over to YouTube and check it out here or watch it below.

If you are viewing this from a Remote Desktop session, you will need to copy the link and paste it into a browser on the client machine or a personal computer.

Link: http://www.youtube.com/watch?v=M6Qtt-hNxnY


Search by Record Number

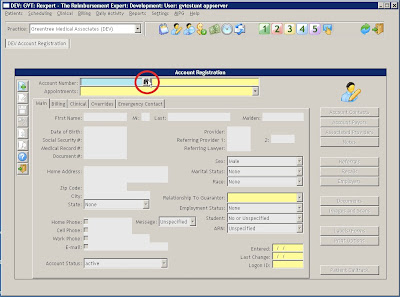
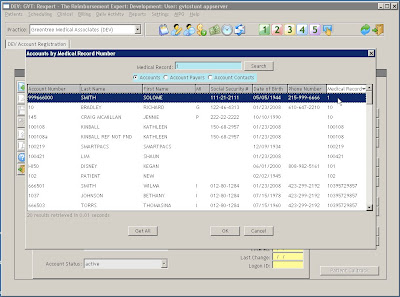
Hello everyone, here's another helpful tip from the people at GVT. This post is going to show you how to search for a patient using their Medical Record number. After Rexpert is open, bring up Account Registration and click on the Lookup button (black binoculars), which will open the Lookup screen:


(Click any image to enlarge.)

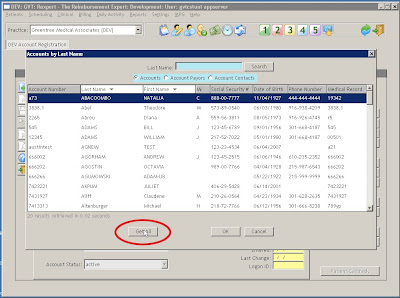
Now that you are in the Lookup screen, click the Get All button, which is in the bottom left corner of the screen:


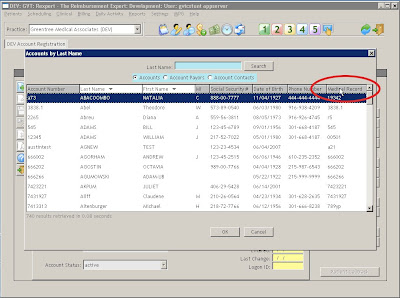
Because we want to search by Medical Record, we are going to click on the "Medical Record" header in the browse. This will sort the records by Medical Record, and also change the search box to search by Medical Record instead of name:


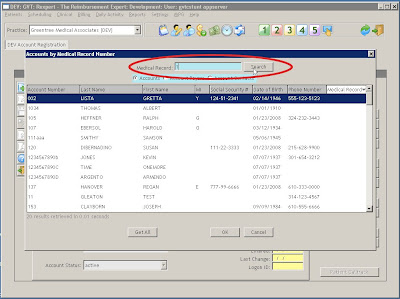
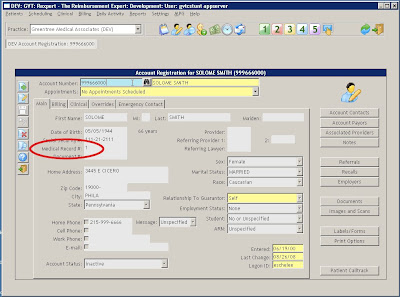
Now that all of the patients are loaded and our search box is going to use Medical Record number, type in the Medical Record you are searching for. We will search for the patient with the Medical Record of "1". After you type in the number, press Search or hit Enter:


The search will take you to the first entry that matches the search, which is the exact patient we are looking for:


Just double-click on the patient in the browse to open up that patient in Account Registration:


Monday, August 2, 2010

Changes in Registration

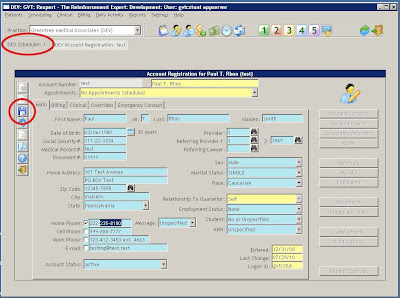
Hello everyone, the GVT team is back with another helpful piece of information. Today we will be showing you how to change a patient's information without closing the current screen.

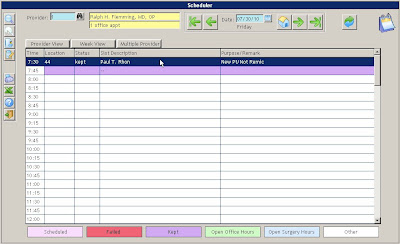
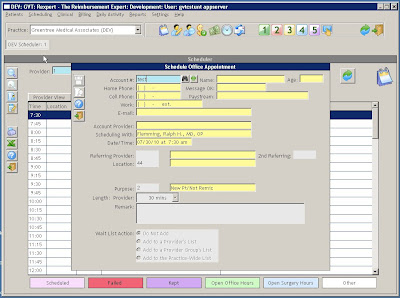
First, open up the Scheduler and make a new appointment:


(Click any image to enlarge.)

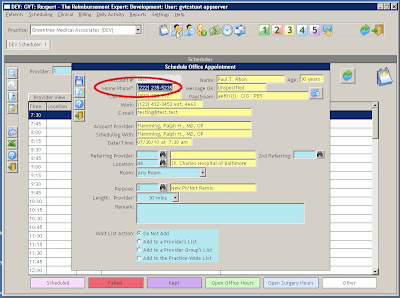
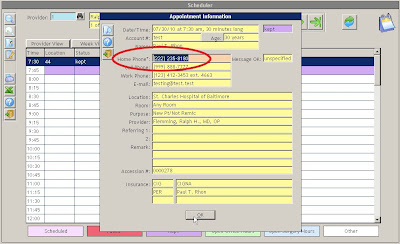
Now enter in the patient's Account Number. This will bring up the account information:


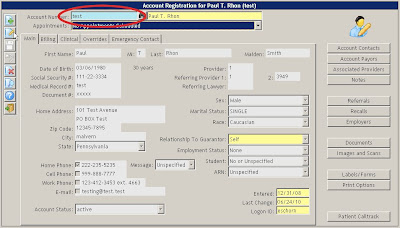
You look at the patient's home phone number, and realize that it's not correct. Instead of closing out of the window, finish making the appointment and save it. Now, open up the Account Registration screen, without closing the Scheduler. The account number will already be entered, so just press Tab or Enter:


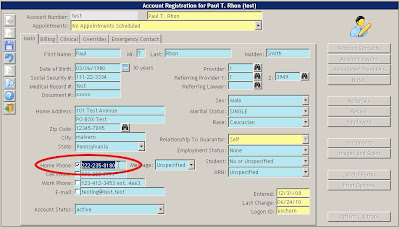
Now, press the Edit button and change the information, phone number in this example, to the correct values:


After the incorrect values have been changed to the correct ones, save the changes and go back to the Scheduler:


The appointment should still be there. Now, open up the scheduled appointment, and the information will be changed:


Using this method should save some time because you won't have to close and open windows multiple times to check the information is correct.

Wednesday, July 14, 2010

Best Way to Find Payor

Let's say that you have a list of around 1,000 payors, and you wanted to make a change to Penna Medicaid. Since you most likely won't want to scroll through the 800 payors before Penna, this will help you get there much faster.

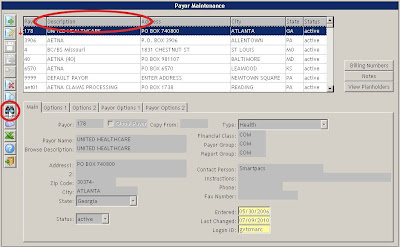
The first step is to press the "Get All" button (black binoculars with the blue arrow), and then click the "Description" column header. This will give you a complete list, sorted by description:


(Click any image to enlarge.)

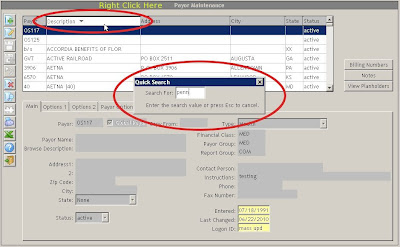
Next, right-click in the "Description" column header, then type in the first part of the Payor description. Since we are looking for Penna Medicaid, type "penn" into the search box. Press enter after you have typed in the search value:


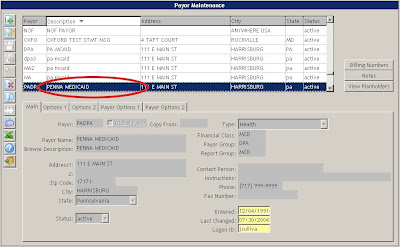
After you press enter, you will be taken to the first entry that matches the search. This should help you find the payor that you're looking for much faster, and without all of the scrolling:


Thursday, July 8, 2010

Welcome!

Hello, and welcome to the GVT-REXPERT blog! This is where we will be posting information about our Rexpert software, including useful tips and helpful comments. You can subscribe to this page by clicking on the "Posts" box under "Subscribe To" on the right hand side of the screen.