Thursday, December 15, 2011

Lock Box Address Rejections

Expect claim rejections when sending claims with a Post Office or Lock Box as the Billing Provider Address. Just what you wanted to hear right?

Well, we have a fix for you! You can avoid these not-so-pleasant delays by immediately transitioning to the use of a street address or physical location; you may not have the luxury of waiting for the HIPAA 5010 conversion or the March 31, 2012, compliance deadline. 


IN A NUTSHELL
Some payors are immediately transitioning to the use of the HIPAA 5010 standards, and they are requiring that the Billing Provider Address on claim submissions include a street address or physical location. They are rejecting claims that use a PO Box or Lock Box as the address. Payors may enforce this change at any time as they prepare for and complete the transition to the HIPAA 5010.

If your practice wants the payments sent to a PO Box, then some review needs to be completed for each payor; the street address or physical location on the 5010 claim is a requirement, and it must be satisfied to submit claims. However, many payors will NOT use the address from the 5010 claim as the “pay-to-provider” address when generating payments; instead, they will use the “pay-to-provider” address from the original enrollment. In the event that a payor will use the “pay-to-provider” information from the 5010 claim, then contact Client Services to post an override to the payor entry in REXPERT™.

Additional details on this change are available in Emdeon's "5010 Issues and Challenges" document located in the download section of Emdeon's "HIPAA Simplified" online resource available at: www.hipaasimplified.com.


Thursday, November 17, 2011

Nine Digit Zip Code in Tables

The 5010 electronic claim format is required by January 2012 and all practices must comply.

Make sure to update your practice, provider, and location tables with a nine digit zip code.  Failure to do so will result in claim rejections. 

You will find a quick link for the USPS Zip Code website in the Account Inquiry "Web Help" tab,


or go to the USPS site directly at http://zip4.usps.com/zip4//welcome.jsp


Thursday, November 10, 2011

Migration form for Medicare

Besides the changes that will need to be done in Rexpert (see separate documentation) clients that submit claims using their own Submitter ID will need to send Highmark EDI a 5010 Electronic Remittance Advice Migration Form. This is for “existing ERA customers” only.

Open the following link:

You might be prompted to agree to the terms of their website, if so, then select "Agree".  Below is a screen shot of the webpage. Select the BLUE highlighted link for “Version 5010 Information NEW!”


 - Click on any image to view a larger version

Select the highlighted “Enrollment”


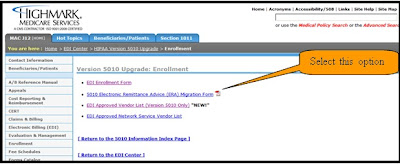
Select the highlighted 5010 Electronic Remittance Advice (ERA) Migration form


This will open the Adobe document that you need to fill out. Most of the information needed (Submitter Name, address etc.) is self-explanatory. 

IMPORTANT NOTE
For the next part “Effective date”,  MAKE SURE YOU COORDINATE this date with Great Valley Technologies support staff. There are additional changes that need to be done to tables in Rexpert. Also MAKE SURE that all prior ERA files have been downloaded prior to the effective date. You will no longer receive version 4010A1 ERA files once changed. Please note that the completed form should be faxed to the number noted on the form 2 business days prior to the effective date.

As always with Medicare forms, make sure the approved person signs the form and files this document.

If you are not sure what your submitter number is from the main menu of the GUI(graphical version) Rexpert go to Settings > Billing Settings > Forms.


Browse the Forms table for the PA01 form, make sure that it is highlighted, and copy the information in the Source ID field.


Thursday, September 1, 2011

Typing Shortcuts: Charge Entry

Have 60 charges to enter in the next 45 minutes? Rexpert supports several different keyboard shortcuts that can help you save time by keeping your hands on the keyboard.  This blog entry can be applied to any program in Rexpert that uses keyboard shortcuts, but we'll focus on Charge Entry specifically, since it has a couple of "specials".

At the main screen, instead of using your mouse to click the Charge Entry icon, use the keyboard combination CTRL-4 (press both the CTRL key on either side of your keyboard and the 4 key).


- Click on any image to view a larger version

Once in Charge Entry, if the default account number is the current patient, press Enter. However, if it is not, press F2 to get to the Account Lookup screen. Typing will appear in the Last Name field automatically since the Last Name field is active as soon as the lookup opens. Pressing Enter will search for the last name just the same as pressing the Search button. If you have found the correct account, pressing Enter again will select that account the same as pressing the OK button.

- You will have to use your mouse if you want to do anything complex with the Lookup screen.

If Notes display for the account you selected, pressing F4 will close the Notes window for the account.

With the account number selected, pressing F3 will create a new charge. The Service Date is the first field selected when creating a new charge; using the keyboard shortcut F2 will bring up the calendar.

Use the Tab or Enter key to navigate through the various fields and buttons; you can tab to all editable fields and all buttons. Any existing text will be highlighted so that your first keystroke will clear the field and start a new text value.

Charge Entry "Specials":
If you want to jump to the Diagnosis Section, press CTRL-F11.
If you want to jump to Personal Payment posting, press Shift-F2. 

If you want to jump to the Procedure Code, press F11.


If you are finished with the charge, press F8 to save the charge. However, if you need to access the other Charge Entry tabs: Main, More Dates, Billing, Notes and Remarks, and InfoOnly, press Alt-1 through Alt-5 respectively.


Other keyboard shortcuts that may be useful can be found in the Rexpert Help Guide, Help->Help Contents and Index. The Keyboard shortcuts section is under Getting Started (For Users)->Keyboard Shortcuts.

Monday, August 15, 2011

Default Procedure Notes

So, quick, how can you bill CPT code 64483 for both left and right on the same day?  Would you enter it twice or use a modifier?  If so, what modifier?  Will Medicare accept or reject it? Hmmmm!

Multiply this tricky little case by 100, and you'll recognize why even the most experienced billers need a way to keep track of special-case instructions.  Rexpert release 9.3 gives you a way to enter this kind of information one time, and then gives you a visual warning (without a time-consuming pop-up) in Charge Entry when instructions/tips are available.

Open a Rexpert session and go to Settings->Procedure->Procedure Maintenance. Choose the procedure to which you want to add a note and click the Notes button.

(Click on any image to enlarge.)

Click the New Note button on the left-hand side of the window. Fill out the Type of Message (this should be set to Display, otherwise the note will only be visible if you come back to this screen) and the Message itself.  Once you have filled this out, click the Save button on the left-hand side of the window. You can enter multiple lines of information, if needed.


Later, when you are entering charges and use this code in the Procedure field, it will change from the regular light blue to a bright yellow. This means that procedure has notes that you can view.


To view those notes, press CTRL-D on your keyboard; press the CTRL key on either the left or right-hand side of the keyboard, and the D key at the same time. When you are done viewing the notes, click the OK button at the bottom of the Procedure Information window. If a procedure doesn't have notes, the Procedure field's background will not change colors.


There you have it! A quick and easy way to give yourself useful hints and tips when creating a charge.

Monday, August 1, 2011

Mobile Scheduler: Voice Login

Voice Search is a feature included on Android smartphones with version 2.2 (Froyo) or higher. This allows you to use your voice to search Google, your history, or your bookmarks. Since the Apple iPhone does not include this feature, this blog post is for owners of Android devices. Add the web address for the phone scheduler to your bookmarks. Tap the Bookmarks icon in the top right-hand corner of the web browser and follow the instructions to add the web address.

Make sure your Android smartphone is awake and positioned to the screen where your Voice Search icon is located. If you don't have a Voice Search icon on any of your screens, tap the Applications button located on the bottom of any of your screens. Then, search through your application list until you find the Voice Search icon, and tap it.


A new window will appear that says Speak Now. Say in a clear and even tone, "go to Google bookmarks". If Voice Search interpreted what you said correctly, you will be taken to your, Google Bookmarks page where you previously added the phone scheduler's web address.


Tap on the website address of the phone scheduler to go to the login page. Sign in using your username and password and you will be able to see your schedule much faster than by typing in the web address every time.


 Contributors: Sullivan Wingerd and Solomon Staggs.

Monday, July 25, 2011

Defaults in Certain Screens

Setting Screen Defaults is an excellent way to make it easier to print, view schedules, or anything else where you see the Defaults icon. You can select the report type, dates, and codes once, instead of having to type them in every day or week.


Log in to Rexpert and open the program for which you want to set defaults; this blog post will focus on setting screen defaults for the Daily Schedule. Open the Daily Schedule Options by navigating to Scheduling->Reports->Daily Schedules.

From here click on the Defaults icon located on the left-hand side of the screen.


Click Yes to update the screen defaults for your account. All fields that are blue will have the contents saved as the defaults, except for the date and (for other screens which contain them) fiscal period fields.


Click Yes if you want to update your Screen Defaults with default dates as well. You will almost certainly want to do this. Each date on the screen will be brought up one at a time so that you select its default value.


Clicking Yes will present you with a list of options for how the date is to be handled. The list of options can be set or skipped for each date field.
These options include:
  • No Default
    •  No default is saved. Any date entered into the date field is not saved when the Daily Schedule Options window is closed.
  • As Entered
    • The date you have entered when you save the Screen Defaults. Any date entered after this is not stored, you'll have to set new defaults to set a new date. 
  • Manual
    • A custom date that you can enter while setting the Screen Defaults. Again, this date doesn't change.
  • Yesterday
    • Yesterday's date for whatever the current date is. For example if today is August 1, this date will default to July 31. If you run the report a week later, on August 8, it will default to August 7.
  • Today
    • Today's date for whatever the current date is. For example if today is August 1, this date will default to August 1. If you run the report a week later, on August 8, it will default to August 8.
  • Tomorrow
    • Tomorrow's date for whatever the current date is. For example if today is August 1, this date will default to August 2. If you run the report a week later, on August 8, it will default to August 9.
  • First Day Of
    • The first day of either the last week, last month, last year, current week, current month, current year, next week, next month, or next year.
  • Last Day Of
    •  The last day of either the last week, last month, last year, current week, current month, current year, next week, next month, or next year.

Click OK when you have selected the appropriate setting for the date field (it will ask you to pick a setting for each date field).
Click OK when your defaults have been saved.


Setting up Screen Defaults is an easy way to save you time throughout the day. While this blog post focused on setting the defaults for the Daily Schedule, this post can be applied anywhere you see the Defaults icon.

Wednesday, July 20, 2011

Mobile Scheduler: How To

Using the web, you can now keep track of your schedule when you’re away from your office. We've designed a site especially for smartphones and tablets. The REXPERT Schedule Review via Web Browser facility has been tested on various devices including several Android smartphones, the Motorola Xoom (an Android tablet), the Apple iPad, the Apple iPhone, and the Apple iPod Touch. You can also access it from any standard computer, using a browser such as Firefox or IE!


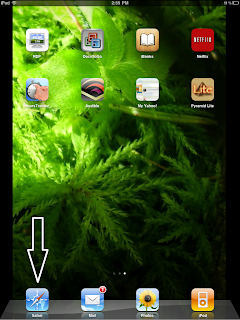
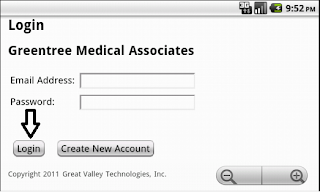
To view your schedule, start by tapping the web browser icon. On Android smartphones this icon is usually located at the bottom of the home screen. On the iPhone this icon is labeled Safari and is located in the bottom left hand corner of the home screen. Log into the website using your user name and password, and click Login. [Hint: you can also press “Go” or “Submit” on the screen keyboard after typing your password to make the process one click faster.]


                    On Android 2.2                                                  On the iPhone


By clicking on the Login button, your schedule for the current day is presented to you. This is your schedule exactly as it is in Rexpert at the present moment. If a new appointment is scheduled and you refresh your screen, you will see the change right away. The schedule is not uploaded to your phone, but presented dynamically, reflecting changes as they occur throughout the day. Your appointments are arranged in chronological order. From the initial display, you can navigate from day to day using the  Previous, Today, and Next buttons. Clicking the Logout button will log you out of the website. Make sure you logout of the website if you are on a public computer.

Your scheduler is displayed using a secure site (https). However, think twice before accessing it via a public wi-fi system (rather than your phone's service provider). If you would feel uncomfortable accessing your bank web site in any given situation, you should probably not access your schedule either. Please visit How to Stay Safe from the PCWorld Business Center for more information.

On smartphones, like Android or the iPhone, you can call a patient by tapping the phone number on the screen. On Android smartphones, a short tap will bring up the dialer and from there you can press the Call button.


A long tap will bring up a list of options that include: Dial, Add contact, and Copy.


The iPhone has similar functionality.


If you would like to start using this new feature, please e-mail us at
guidev@practice-alt.com or contact us through the feedback button on the main Rexpert window and we will set you up with a login and password.

Monday, July 11, 2011

Easy "End" in Account Notes

Getting to the end of Account Notes can take a while when there are hundreds of notes. Get quickly to the last note using this one Weird Old Trick (and no, you don't have to sign up for three free offers first): the End key.

The location of the End key differs depending on the style of your keyboard, but normally it is located just to the left of the Page Down key. Pressing the End key will navigate to the last Account Note for that patient, and pressing the Home key will navigate to the first.

Hit the End key, it's really just that simple.

Thursday, July 7, 2011

Search Using Lookup Button

Recently, some of you have been asking questions regarding lookups and their use.  GVT has added some new features to lookups over the last few releases, so here is a short demonstration of some of the standard ways that lookups are used.  Because of the many searching options in the Account Lookup, it will be the focus of this post.

To access the Account Lookup, press on the binoculars next to the Account Number field in Account Registration:

(Click any image to enlarge.)

The Account Lookup opens.  Notice the default search option is for accounts on a last name, first name basis. This means it is possible to search for patients by simply entering in all or part of their names:

(Information has been censored which may be used to identify the fictional* patients used for demonstration purposes.)

Now, take a look at the general design of the screen.  There are four separate elements on this screen.  The most important element on the screen is the browse itself, where the patient information is shown.  Next, the column headers along the top of the browse are very useful.  For example, to search by Medical Record Number rather than by Last Name, First Name, simply click on the Medical Record Number column header:

(Information has been censored which may be used to identify the fictional* patients used for demonstration purposes.)

Notice the Get All button at the bottom of this screen.  Anytime you see this button, you are only dealing with a portion of the account records.  In order to access all accounts at once, press the Get All button.

At first glance everything appears to be the same.  However, underneath the browse in light gray letters is displayed the number of patient accounts found, and the amount of time it took to retrieve them.  Notice the comparison between the numbers before and after pressing Get All:

The more patient records your practice has, the longer the Get All feature will take.  The information for all of the patients seen by your practice, often numbering in the hundreds of thousands, has to be copied from the computer which stores the data to the memory of the computer showing the lookup.  The more often you look up patient information by retrieving all accounts, the more you slow down your session.  Accessing thousands of entries every time you attempt to look up one patient is not necessary.  It is almost always possible to find the account you are looking for more quickly by simply using the search feature.

(Note: An exception is when you need to search by Phone Number.  For all other columns, click on the column header and then enter the info into the Search field and find the account that way.)

Sometimes you don't have any patient information, and only have a subscriber policy number or the name of a parent or spouse.  This is where the other two options immediately under the search box can be lifesavers!


The general functions of all other lookups found in Rexpert are the same as for the Account Lookup.

* All patient names displayed are fictional. Any similarity to actual persons, living or dead, is purely coincidental.

Monday, June 13, 2011

Scheduler: Ctrl-D for Co-Pay

A helpful suggestion was submitted via the Feedback Button, requesting the option to view co-pay information in the Scheduler. We are pleased to announce that this feature is already available, and may be accessed in two different ways. Here are the steps to view the co-pay as well as other relevant details about a patient account from the Scheduler:

When scheduling the appointment, enter the Account # of the patient. However, do not press the Enter key on the keyboard. Instead, while the entry is still highlighted, press Ctrl-D to bring up the Account Information screen:

(Click any image to enlarge.)

(Note: To perform a Ctrl-D, simply press and hold the Ctrl key on the keyboard and before releasing it, press the letter d on the keyboard. When the new screen appears, release both keys.)

Using Ctrl-D gives you access to many of the details about the account, with the option to drill deeper. On this screen, notice the View Account options to the right. Select the Payors option:

This is just one of the available ways to view many details of any patient in a quick and timely fashion. Another option is available if you want to quickly look up the Co-pay and don't need any other account details. To do this, enter the Account # of the patient or find it using the Lookup button. Once the account is open, click on the Insurance Information button, which will appear to the right of the Paystream field:


The Insurance Information window will appear, allowing you to view the Co-Pay Amount:


At the bottom of this window, you also have the option to click the Switch to Complete View button to open the Account Payors screen. When you find the information you are looking for in Account Payors, exiting that screen will bring you right back to the Scheduler to continue with booking the appointment.

Using Ctrl-Dwill help you quickly obtain many details about an entry in any field. Also, pay close attention to buttons that appear after you have made a selection, because they will often provide more levels of information.

Tuesday, April 12, 2011

Medicare Claim Numbers

An exciting new feature has been added to Account Inquiry to help save you time when you need a Payor claim control number for a charge. Suppose you need to talk to Medicare about an incorrect payment amount. When you call, they may want this control number, and you can get it without trouble.

To begin, open Account Inquiry and enter the patient's account number. Choose the Financial Details tab:

(Click any image to enlarge.)

Press the Pick Charges button and select Show Zero Balance Charges:


You may also enter more criteria to find the specific claim you are looking for faster, such as the Date or Payor.

Now, take a look at the screen. With the default column sizes shown, there is little room for the information in the Description column to be seen. Hover the cursor over the line dividing the columns:


Now, click-and-drag the mouse to the right, expanding the Description column as you do. As you can see, now there are claim control numbers shown in the descriptions:


This was a great new feature based on a user request. Please submit more ideas like this one using the Feedback Button, and let GVT know when you appreciate new features. This provides a quick pat on the back for the developers, but (more importantly) insight into what types of changes help improve your experience the most. The more feedback, the more future modifications or additions to commonly used screens will benefit you.

Wednesday, March 16, 2011

Patient Tracking View

One of the newest, most exciting features incorporated into Rexpert is the Patient Tracking View of the Scheduler. From the moment when patients first arrive to the moment they leave the building, you can monitor the amount of time they spend in your practice. Here is a demonstration of Patient Tracking in action. First, navigate to Scheduling -> Patient Tracking View:


The first step is select the Location you wish to track, and all of today's scheduled patients will appear:


The next option allows you to choose what tracking options to show. Notice that most of the options in the drop-down list are the same options you see in the side selection list. This is helpful especially if you have a high volume of patients using your facilities, or maybe if you are hoping to determine the usefulness of an exam room based on how often it is in use throughout the day:


Use comments on a regular basis, or to note anything out of the ordinary about a transfer from one room to another. When someone is discharged, it is very helpful to note any small comments that might come in handy later. With the options available to select just when a patient is transferred from one room to another, there is no need to worry about managing this list too closely. It is possible to accurately report a patient being transferred up to half an hour after the move has occurred:


Once you have used this feature, you have the capability to run a report to discover how long each room is in use, how long patient wait times are, and the general effectiveness of each area of your practice:


Patient Tracking is designed to be used on a day-by-day basis. This doesn't mean that you must use it every day, but it can be helpful from time to time to use this feature in order to find ways to decrease the amount of time patients wait while they are in various rooms. Because of this, by default, all scheduled appointments show up at the beginning of the day for your chosen location. As the day goes on, when you move patients from room to room, simply select them in Patient Tracking. You will be able to not only keep track of where your patients are without leaving the desk, but also to find ways to streamline your process, and maximize your effectiveness in terms of patients seen and waiting times.

Be sure to contact GVT via the Contact Us button in the home screen to learn how to activate this feature for your practice!