Monday, December 23, 2013

Healthy Holidays

Tis the Season: A Holiday Poem

Tis the season... fever season, cold season, flu season,
Snow season, hot cocoa season, me and you season.
A season for gift-giving and spending time with friends,
And awkward family dinners that never seem to end.
But a midst this time of Winter Perfection,
Take some time for this year's reflection.

Think of all the people you've seen,
The healthy, the sick, and those in between.
Maybe you're the one who treats their ills.
Maybe you're the one who handles their bills.
Either way, you've helped them out.
You've helped treat everything from headaches to gout.

Though you may not see it, the work you've done,
For those people now sharing the season's fun.
You gave them the greatest gift you could give:
A healthier future for the life that they live.

To sum it all up, here's what I mean:
Thank you for all you've done in 2013!

Happy Holidays from GVT

Written by: Kylie McKenzie Soder

Tuesday, December 17, 2013

Preferred Language

Rexpert is taking steps to incorporate support for Meaningful Use core measure #7. One way we're doing this is by adding Ethnicity to Account Registration. Continuing with the January, 2014, update, the option to choose a Preferred Language, as well as the need for an Interpreter, will be available.


As with ethnicity, we will transition all your previously entered language information over to the new field as best we can.This may seem like a hassle, but (besides being required by law) a list of universal language codes makes the required transfer of data from system to system possible. (Which is slightly ironic, if you think about it... we're creating a new system of symbols to represent various languages. In other words, we're creating an entirely new universal language to categorize non-universal languages. Personally, I think that's hilarious... anyway, back to the important stuff...)


To support this, a new Language Maintenance table will be available to maintain the ISO 639.2 standard language codes:


Note: Care is required when editing a language code. These codes are a part of a standardized government list, and have been selected for easy translation between systems. Contact Client Services if you have any questions or need help editing language codes.


At the moment, the default value for the Preferred Language field in Account Registration is English. This can be changed. If, for example, the majority of patients you see are Spanish or Russian speakers, contact Client Services to change the default preferred language for your practice.

Also, as a reminder from last week's blog post, once these changes are implemented into Rexpert, some changes will have to be made on your end as well:
  • Be sure to update your encounter forms to include race, ethnicity, preferred language, interpreter required, and sex (as opposed to gender).
  • Once you have made these changes, please print out a copy, black out identifying information, show us where you want ethnicity/race/language to appear, and fax it to 775-618-1358.
These updates are in an effort to make medical care easily accessible to everyone. If you have any suggestions or ideas that can help the process, let us know by contacting Client Services using the Feedback button or leave a Comment below.

Written by: Kylie McKenzie Soder

Monday, December 2, 2013

Ethnicity

Meaningful Use outlines twenty-four required objectives. Of the fourteen core measures, objective number seven regulates that both ethnicity AND race must be supplied by patients. There are no exclusions.

Rexpert needs to support Meaningful Use, so with the release of Rexpert 10 (R10), Account Registration has been updated to contain and specify these two fields.


The acceptable values for ethnicity are:

Note: Any account that fails to collect race or ethnicity data, thus recorded as Unspecified, will be suspended. However, patients may choose to not specify a race or ethnicity. This choice will be recorded as Refused to Specify and this will not suspend the account.

Now that Rexpert has been updated, we've done all we can on our end. Now, it’s up to you to implement this change into your practice. Here’s what you need to do:
  • If Hispanic is listed as a Race on your encounter forms and/or in your Race table, you will need to remove it. According to Meaningful Use, Hispanic is not a race. Note: For all patients recorded in the system as a Hispanic race, we will change this field to an unspecified race. This field can then be updated at the time of the patient’s next appointment. This is confusing enough to us, and can be doubly so to patients who have grown up identifying their race as Hispanic. We have found a very good resource at WireQH which gives you scripts to follow when discussing this with your patients. This will be especially helpful to the front desk workers who need to directly interact with people who may be frustrated or upset.
  • Be sure to update your encounter forms to include race, ethnicity, preferred language (to appear in the next release), interpreter required, and sex (as opposed to gender).
  • Once you have made these changes, please print out a copy, black out identifying information, show us where you want ethnicity/race/language to appear, and fax it to 775-618-1358.
Why does this matter?  These questions are sometimes uncomfortable to ask and can make patients or staff feel awkward.  The NIH has a paper on this subject. The conclusion?  "If HCOs make a commitment to systematically collect race/ethnicity and language data from patients, it would be a major step in enhancing the ability of HCOs to monitor health care processes and outcomes for different population groups, target quality initiatives more efficiently and effectively, and provide patient-centered care."  We can only hope they are right!

Do you have any thoughts on the subject? Let us know in the Comment section below. And, as always, contact Client Services via the Feedback button if you have any questions, comments, or good ideas to share.

Monday, October 28, 2013

Font 9 Error

We love to hear your opinions. It's suggestions and comments from you that keep us updating Rexpert. Our goal is to create software that reflects the high standard of care that you provide for your patients. The only way we can do that is with your help.

So, once again, we need your help. Recently, Client Services has received several complaints about a Font 9 not in font set error. The feedback we have received so far has made us aware that this error exists... Unfortunately, we are having some difficulty reproducing the error ourselves. Record of the error has been appearing in our logs regularly, but we are at a loss when it comes to figuring out what causes it. 

This is extremely annoying, not just for you but for us too. From what we have gathered, the error is being caused by "something" interfering with the fonts that Rexpert has loaded into memory. The key to ending this enigma is identifying what this "something" is...

Now, this is where you can help. Keep sending us feedback. Please. As soon as you see this error, we would love to hear about it in as much detail as you can give us. The more the better! Please include things like what you were doing prior to getting the error. Were you running a report? Exporting to Excel? Scheduling an appointment or deleting an account? Were you scheduling an appointment, and then deleted an account? Whatever it is, let us know. The more information you provide, the better our chance is at reproducing the error and solving this issue.

For example, for one client, we were able to narrow the problem down to a specific printer (a laser Jet 4300). Thanks to the detailed feedback we received, we discovered that the Font 9 error would appear immediately after the client printed anything to that printer. Tech Support was then able to go in, re-install the printer drivers, and hopefully fix the issue. There is almost certainly the same thing happening in other cases: these errors show up after printing to a certain printer or using a certain device.

Note: This is not simply a Rexpert issue. The error is a result of other other activities in your RTS session. For example, if you are set up to use Excel or Word outside of Rexpert and have large files open, please tell us. This would give us something to investigate.

Don't let these Font 9 errors get you down. Help us help you by letting us know more about any errors you receive. Use the Feedback button to contact Client Services, or leave a Comment below and tell us what we can do to improve your Rexpert Experience!


Written by: Kylie McKenzie Soder

Thursday, September 26, 2013

Display Patient

When a patient is on the phone with a scheduling question, do you find yourself flipping through several screens to check one appointment? It's always the same complicated routine, isn't in: look at a date in the scheduler, then jump to upcoming appointments in Account Registration, then press the Audit button to see who did what, and then flip back over to the scheduler? We've recently observed several users having to deal with this kind of confusion. Luckily, there is an often-overlooked scheduling function that compresses all these steps into one simple screen.


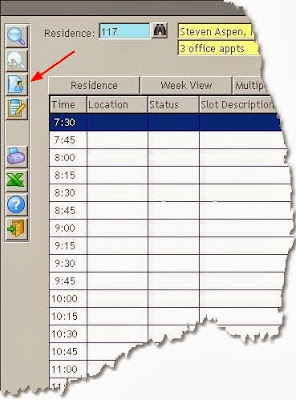
This special screen is activated by a button located on the left-hand side of the Scheduler called the Display Patient button. Selecting this will take you directly to the Display by Patient screen.


As soon as you identify the patient, you will immediately see all appointments ever made for this patient, both past and present.


From there, it's just as simple to find one of the listed appointments in the scheduler. Double click on any listed appointment to go straight to the corresponding date/time/provider in the scheduler. Fast and easy! No need to search endlessly through dates.

Want to delete a specific appointment? No problem! Appointments can be deleted right from the Display by Patient screen. Once you find the correct appointment, just select the Delete button. You can even delete multiple appointments (such as all future appointments) by using Ctrl-left click to select all relevant appointments before pressing the Delete button.

Finally, you can press the Audit button to see exactly the same audit information that you see in the account. You will usually want to press the Scheduling tab when accessing the audit data from this screen. 

Feel free to give this a try. Just take five minutes and see how many keystrokes and mouse clicks you can save!

Has this post been helpful? Will this information save you a lot of time? We'd love to hear your opinions! Let us know in the Comment section below or contact Client Services via the Feedback button.


Written by: Kylie McKenzie Soder

Thursday, September 12, 2013

Easy ePrescribe

As Rexpert Release 10 approaches (September 30), Great Valley Technologies is actively making changes to incorporate ePrescribe into Rexpert. For those of you wishing to interface with Rcopia, these updates will provide a smooth transition to ePrescribe. Note: To those of you unfamiliar with Rcopia, we published a post a few weeks ago about the benefits of switching to ePrescribe. New functionality will be added to Rexpert while several existing screens will be updated to incorporate ePrescribe.

Among the screens being updated, the Medication button in both Account Registration and Account Inquiry will have a new function.


Rather than sending you to the traditional Medications/Prescriptions screen, you will be instantly connected to an Rcopia screen. This screen will contain access to the patient's prescription information. In seconds, you will be able to prescribe and refill medications, review medication history, view allergy information, view prescription refill status, etc. What you are able to do in this screen will depend on your level of privilege (provider, provider agent, clinical staff, etc.).


A screen change will also be made to the Clinical Tab in Account Registration to include a display-only field for your patient's Rcopia ID.

Note: Though such fields as name, sex, and zip code are not currently required in Rexpert, these and other fields will be required when using this new ePrescribe function. For a full list of required fields, contact Client Services via the Feedback button.


In addition, several new screens will be added. Under the Clinical Menu, Rcopia Messages and Rcopia Reports will send you straight to their corresponding Rcopia screens. These screens will notify you to any messages or alerts you may receive.

If you are a provider, the system will check every 10 minutes to see if you are logged in. If, at that time, you have any medications needing renewal or messages of importance to address. If so, a yellow alert box will pop up on the top of your Rexpert screen. This will let you know that you need to go to the Rcopia Messages menu option for further details.

More changes are constantly being made to Rexpert and we want to keep you informed. Let us know of your questions and good ideas. We love to hear them! Simply post a Comment below or contact Client Services via the Feedback button.

Written by: Kylie McKenzie Soder

Wednesday, September 4, 2013

Quick Charge Entry

This just in! A new Wonder Pill has been discovered! Instantly grow extra arms as well as gain the ability to be in several places at the same time. Not only that, but you can also read minds and move objects like a Jedi! Multitasking has never been simpler, and all with one small pill...

Wouldn't that be nice? I think so. Too bad we all belong to the frail race of human beings and cannot perform such wonders. Humans are simply meant to struggle through life, rush to get everything done, and function on five hours of sleep and/or three cups of coffee. That's what we do: struggle.

For Doctors, however, the struggle will become easier. Rexpert is developing a new function for the iPad called Quick Charge Entry. Perfect for your doctors on the go!


Among its many functions, Quick Charge Entry will give doctors access to current patient data, allow them to create charges in the hospital, and relay patient-related instructions to the staff back in the office.


For example...


Imagine you are a doctor doing nursing home rounds. You have nothing but your trusty tablet which presents you with a list of all the patients you need to see, organized by floor, room, and bed. As you walk from bed to bed, patient information is at your fingertips. For every case, you have the ability to issue instructions to staff in seconds. At the first bed, you write, "Please call patient's daughter and let her know that her mother's med dosage will be changing." Done! Instantly, that instruction is sent to the staff along with the charge information for today's visit. For bed number two it's, "Please send these records to the referring provider." At bed number three you say, "Send the nursing home instructions on a low potassium diet." The possibilities are endless!

Not all of us can have multiple arms, but every doctor should have access to technology that makes their job easier. If you had one super power that would make your job easier, what would it be? Let us know in the Comment section below. Questions or concerns? Contact Client Services via the Feedback button.

Written by: Kylie McKenzie Soder

Tuesday, July 30, 2013

ePrescribe

ePrescribe. Many of you asked for it, so we are actively working to include it in the next release. We are partnering with DrFirst, a leading company in electronic prescribing, to incorporate their Rcopia product. Rcopia has won several awards in the past few years including the Surescripts Gold Solution Provider certification.

Now, I bet you're wondering what ePrescribe can do for you. How will switching to electronic prescriptions help your practice?

Three reasons to use ePrescribe:


Patient Safety:
  • Over 7,000 people die every year due to medication errors like illegible handwriting, overdosing from duplicate therapies, and missed drug-related allergic reactions. ePrescribe eliminates human error like handwriting and overlooked information. You will receive warning messages if patients are renewing prescriptions too early or are receiving prescriptions from multiple providers. It even checks allergy information automatically so you don't have to! Let's keep our patients safe by removing the main causes of accidental death.
Green Offices:
  • Did you know that an average of 3,000,000,000 paper prescriptions are written per annum?! That's any where from 25,000 to 36,000 trees a year! That makes, assuming one acre of forest land can support 600 trees, 60 acres of forest used every year for prescriptions! Switching to ePrescribe will eliminate all that paper waste. Wouldn't it be nice to feel like you're helping, not only your patients, but the environment as well?
Efficiency:
  • Here's an age-old story we all know well: a patient comes into the office for a visit and is prescribed a medication upon departure. She takes her prescription to her pharmacy only to find out that her insurance does not cover the medication. What does she do? Does she call her doctor and wait for him to find a medication that's covered, which could take days? Or does she simply pay then and there at a higher cost? Or does she just decide to not take the medication at all, with negative consequences? With ePrescribe, doctors will be able to see immediately what prescriptions are covered by an insurance company. This will save time, and saving time means saving money! 
Amazing benefits right?! But that's not all. Remember our post on PQRS benefits and penalties? As with PQRS, under the Medicare Improvements For Patients And Providers Act (MIPPA) your practice will receive penalties for not switching to ePrescribe starting at a 1% reduction in your Medicare payment, rising to 2% in 2014, and only continuing from there.

So, are you ready to switch? Well, it's easy and affordable! Use your Feedback button to contact Client Services for pricing details.


Contributor: Kylie McKenzie Soder


Thursday, July 25, 2013

Me Pay Prepay!

As an introduction to our third installment in our Co-pay Series, I would like to share a little story:


This is Caveman.
             
              Caveman has a problem...

                            He really wants to get a forehead reduction...

                                                  The procedure is going to cost $5000...

                                                                            And he does not have insurance...


What should poor Caveman do?!

"Me pay prepay!" -Caveman

Caveman goes and sees a doctor who tells him the procedure will cost $5000, which needs to be paid in advance. He decides to go ahead with the procedure and pays the $5000 at the time he gets his surgery scheduled.

Cavewoman, upon seeing her husband’s new small forehead, decides she needs counseling to deal with the change. She does have insurance, but she also has a large deductible that has not yet been met. She decides to have 10 sessions at $100 a session. She pays in cash each time she sees the counselor.

Both of these cases would be entered into the system using Pre-pay.

To enter a prepayment, go to the Scheduler and right click on the patient's appointment. For Caveman it would be the date of the scheduled surgery, and for Cavewoman it would be the date of the counseling session. From the list of options, select the Co-Pay button (remember when we did this last week?...):


When the Co-Pay window appears, select the Prepay option. Enter the desired sum into the Amount field, select a Method of payment, and add a Note if you choose. In the case of Caveman, you would not want to enter a Procedure Code, because there could be several codes with a large procedure like a forehead reduction. However, a procedure code would be useful in the case of Cavewoman since she may have two charges for each visit: a counseling session which her insurance will not cover (and to which the prepayment should be applied) and a medication management charge which insurance will cover (and should be left open for the eventual insurance payment).


Note: It's easy to confuse Prepay and Other Amount. The main thing to remember is that Other Amount applies funds to the co-pay and the personal balance. Patients that do not have insurance or haven't met their deductible may not have a co-pay or a personal balance. This is why we use prepay.

Once you select the OK button. you will be prompted to choose a printer for the receipt. It's as simple as that.

The pre-paid money will be applied to a special $0.00 pre-pay charge.  When any charge matching the patient, date of service, and procedure code (if entered) becomes due from the PER payor, the money will be automatically transferred from the pre-pay  charge to the new charge.

I hope you have enjoyed our series on Co-payments and Pre-payments. Post any questions in the Comment section below or contact us via the Feedback button.

Contributor: Kylie McKenzie Soder

Tuesday, July 23, 2013

Co-pays in Scheduler

Hey, remember last week's post, Co-Pays for Days? Well, here is the second installment in our series on co-pays. Now that you know the basics of how co-payments work, it's time to put them to use in the Scheduler.


Once in the Scheduler, right-click any appointment to display the Right-Click Appointment Menu. There are several useful options on this menu, but for the purpose of this blog, we will be looking at the Co-Pay option:


This option opens a new window with five methods of payment for the patient: Co-pay, Personal Balance, Co-pay + Personal Balance, Other Amount, and Prepay.


This post will cover the first four options. There will be a post completely dedicated to prepays on a later date.


The first option is the most common in our series on co-pays. When this option is chosen, the Amount field will default from the Account Payors screen in Account Registration. This amount can be changed if it is incorrect or the patient is paying only part of it.

The second option, Personal Balance, includes anything from Personal, pre-collections, and collections. This amount is a sum of the balances of all the qualifying charges, so it cannot be changed here.  The idea is that when you ask a patient to pay the co-pay, you can also try to collect any personal balance outstanding.  This amount will only include charges which have completed their insurance billing.

The Co-pay + Personal Balance option simply adds the default co-pay amount to the Personal Balance total. Just like the Personal Balance amount, this amount cannot be changed here, and includes only charges which have completed their insurance billing.

The final option is called Other Amount. This option is a little bit more interesting. Any amount entered via this option will first go towards the Co-Pay amount, and then anything remaining will go towards paying off the Personal Balance amount.

Post any questions in the Comment section below and be on the lookout for next week's post on Pre-pays!

Contributor: Kylie McKenzie Soder


Wednesday, July 17, 2013

Co-Pays for Days

This week, we’re going back to the basics… and I mean really basic. This post is an overview of co-pays. For those experienced in the medical world, this post might not seem very useful. However, it is my goal to provide useful information to those just starting out. Also know that this is the first post in a series about posting co-pays and pre-payments, so reviewing this information may be beneficial.

Health insurance is defined by Investopedia.com as “A type of insurance coverage that pays for medical and surgical expenses that are incurred by the insured.” If health insurance were that simple, this world would be a lot less stressful. It’s not that simple, however, and although insurance companies are there to insure coverage, they are still businesses, and the aim of any business is to make more money than they lose.

So, a patient finally gets coverage. He does everything right, he pays his insurance premiums, he tries to avoid accidents. Even after all this, the day comes when a trip to the medical office is unavoidable. Think he’s completely covered for any procedure? Think again. Once in the doctor’s office, there are three more methods the insurance company can use to get him to pay.

The first method is called a Deductible. This means he has a predetermined amount he must first pay out of pocket before the insurance company will cover expenses. It’s part of the deal a patient makes with his insurance company. If the patient has a lot of medical procedures, that's a lot of money for the insurance company to pay per year. So, the company first gives the patient a set amount for the year that he has to pay off all by himself (let's pretend that's $2000). This $2000 is the deductible. Once the patient pays $2000 out of pocket for various medical procedures or medications, the co-pay and co-insurance agreement will go into effect.

To explain this better, here’s an example: many coffee shops have punch cards. (You know, buy ten drinks and get the eleventh free, that sort of thing.) This is very similar to a deductible. The insurance company/coffee shop agrees that, if you pay for fifty caffeinated drinks out of pocket, every drink after that will be completely free for the rest of the year. Even if you buy an eight dollar drink, if the deductible has been met, the coffee shop will pay for it completely.

As medical expenses have risen, so have deductibles. Some patients pay a $2000 deductible a year or more! Many family deductible plans can be anywhere from $7500 to $10,000 a year.

Alright, our patient finally paid his deductible. Now do you think he’s covered 100%? Nope! The second method an insurance company uses is called a Co-pay or co-payment. Once the deductible is met, the insurance company agrees to pay for medical expenses as long as the patient pays a fixed amount for each office visit. This small amount is the co-pay. This is not a percentage of the fee, but a fixed cost, often ranging from $15-$50. So, in other words, it doesn’t matter how much the office visit costs, the patient's co-pay amount will stay the same.

Make sense? It's kind of like going to a buffet: you pay $7.95 no matter what you eat. You could get the kale salad. Or the sweet and sour pork. Or both! You could eat $50 worth of food, but all you would have to pay is $7.95.

Something to remember is that a co-payment is only made once. Even though there may be several charges during an office visit, the patient does not make a co-pay for each charge. The patient makes a single co-payment the moment he enters your office, despite the extent of the services rendered. Going back to the buffet scenario; you can go back and get food several times during your visit to the buffet, but you only had to make the one payment upon entering the restaurant.

Alright, so we covered deductibles and co-payments. However, there is one more thing we should cover, and that is Co-insurance. Not every medical procedure is completely covered by an insurance company. Insurance will often cover 100% of “preventive” procedures, things like colon cancer screenings, vaccines, and annual check-ups. For all other procedures, there is co-insurance. Depending on a patient’s plan, the insurance company will only cover 50-80% of the allowed charges for all other procedures. (Note: if a provider participates in an insurance company's plan, the insurance will only allow a certain maximum amount to be charged, depending on the procedure code.  Any difference must be adjusted off.)

So, now, let’s go back to the buffet example. Having met your deductible, you only pay $7.95 to choose from the buffet. After eating various types of food, you see the desert menu and a delicious piece of pie strikes your fancy. However, any item on the desert menu is not included in the price of the buffet. The pie slice is priced at $5.00 for any customer who comes in and only orders that slice. For you, though, that delicious morsel would only cost $3.00. Why is this? Since you paid $7.95 for the buffet (meaning that you are enrolled in an insurance plan) the restaurant (meaning the insurance company) will pay for 40% of that slice of pie, leaving you to pay the remaining 60%.

So those are the basics of co-payments. See, not so difficult! In fact, I'd say it's as easy as pie...

Mmm... pie...


Disclaimer: Please remember that while these scenarios are usually the way deductibles/co-pays/co-insurance work; there are always variations and exceptions.

Keep a look out in the next few weeks for a post about Co-pays in Rexpert. Any questions about co-pays? Leave those questions in the Comment section below so they can be answered in the next post!


Contributor: Kylie McKenzie Soder

Tuesday, July 9, 2013

iRexpert? I like!

Picture this: you're stranded all alone on a desert island and you have no food or water. All you have in your hand is an iPad. Somehow, mysteriously, you have a perfect internet connection. What can you do? You can connect to Rexpert!

Okay, so maybe that's not the best solution for a desert island scenario. But for other emergencies (you're on vacation, you're in a meeting, your daughter would kill you for missing another band recital...) it would be very helpful to connect to Rexpert through your smartphone or tablet. Emergency is the key word here: you can connect to Rexpert through your tablet, but it will be tedious and cumbersome to use, since it is meant for a device with a regular keyboard and mouse. However, if there is a question about your month-end reports which needs to be answered immediately, you can at least look up relevant data and run reports to the screen.

To start, make sure your device has an active internet connection. Warning: know your data plan! Wifi is usually free, but constant 3G/4G usage may be expensive. Once you are connected, open the AppStore (for Apple devices) or Play Store (for Android devices) and search for "2X Client". Select the app 2X Client RDP/RemoteDesktop.

To add to its convenience, this app is completely free! All you have to do to download it onto your device is click the Free button and then click it again when it changes to Install.


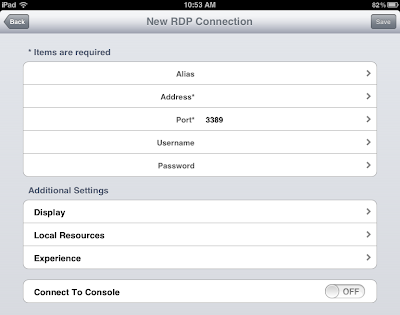
Once the app has finished loading, click it to start setting up your remote connection. Select the "+" sign to add a new connection. When the New Connection screen appears, select the RDP Connection button NOT the 2X Connection button.


Click the Alias field and enter "Rexpert". For the Address field, enter your assigned Rexpert IP address. After you enter the address, accept the default value in the Port field. Enter your Rexpert Username and Password, then hit the Save button in the upper right-hand corner.


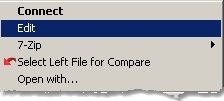
Note: In case you have forgotten, there is an easy way to find your assigned IP address and Rexpert ID. Right click your remote desktop icon and select Edit:


A new screen will appear that contains a Computer field and a User name field. The number in the Computer field is what you will enter into the Address field in 2X Client. The User name, which should include both your machine's name as well as your Rexpert ID, is what you will enter into the Username field in 2X Client. For the Username, be sure not to mistake "\" for "/":


After you hit Save, you will automatically be taken to the Connections screen. You will see that your Rexpert connection has been saved there. And there you have it! Selecting that connection will take you directly to your Mobile Rexpert where you log in as normal.


When you log in, do NOT not save your password. If someone else steals or "borrows" your tablet, you will be compromising huge amounts of protected personal information.

Any questions? Problems creating a new connection? Contact Client Services via the Feedback button or post your question in the Comment section below!

Contributor: Kylie McKenzie Soder


Monday, July 1, 2013

Interface Status

Warning! This post may not be for all users. Viewer discretion is advised. This post is rated:


The Stop/Start Interfaces screen has been updated with a new feature: the Check Interface Status option!

Settings > Tools > Stop/Start Interfaces


There may come a time when documents fail to send... when we are unaware of disconnected interfaces... when important messages go unnoticed... But that is not this day!
This day, we check our status!


With this new and improved update to the Stop/Start Interfaces screen, you can now check the status of your practice's interface with other systems such as Infinitt, Talk Technology, Medquist, etc.

To do this, first select the correct Interface from the drop-down menu. Then select Check Interface Status from the Action radio set. Note: the Command field will fill in automatically. If it does not, or if you do not see the interface whose status you wish to check, use the Feedback button to ask the Development Team to set this up for you. Lastly, select Begin. Information regarding the status of your interface will appear in the large yellow box at the bottom of the screen.


This option is not available for all users. If you think this feature would be beneficial to your practice, contact Client Services via the Feedback button.

Contributor: Kylie McKenzie Soder


Tuesday, June 25, 2013

Special Fax

Accidents happen. If that's not a motto to live by, I don't know what is. We try our best to dance our way through life, but sometimes we trip...
And fall... and break our feet.

Not to worry, though. I mean, that's what doctors are for, right? It should be so simple to go in and get that broken foot repaired and be back to dancing in no time flat. Not all the time, though. Sometimes  mamba mishaps happen at work. That's when things get difficult .... Workers’ Compensation Case Managers are great at getting patients back on their feet, but from the medical end, it is often hard to communicate with them.Trying to share relevant medical documents can be a tedious chore.

That chore has suddenly become a snap. And no, I don't mean with a spoon full of sugar... I'm talking about faxes.  

Anticlimatic? Maybe, but faxes are a really great way to get information out to other organizations. They're easy, fast, and inexpensive. Faxing medical documents to Workers' Compensation Case Managers helps them do all they can get your patients back to dancing. And now, you have Rexpert's Special Fax Utility to send these medical documents in seconds!

To set this up, find the injured patient in Account Registration. Select the Account Payors button on the right-hand side of the screen.


In Account Payors, select the  Workers' Comp payor for the injured patient. On top of the Comment field and to the right of the Co-Pay field, there is a field labeled Special Fax. In this field, enter the fax number of the injured patient's Case Manager.


Now here is where the special fax number comes in handy. Previously, a Workers' Compensation Case Manager's fax number was just squeezed into the memo section of Account Payors. It was a hassle to have to go into the memo section and copy and paste the fax number into the Delivery Dialogue screen. Now, with the fax number having its own field, things have become simpler.

Going through Account Registration, into Account Documents, and selecting the Fax/E-mail button takes you to the Delivery Dialogue screen. This screen can be accessed from several places in Rexpert and allows you to send any number of faxes and/or e-mails. However, the screen will now look slightly different when accessed through Account Documents. The very first line under Recipient Name is usually blank, but you will see that the field has instead defaulted to the special fax number.


Whenever you fax an Account Document for this patient, this special fax number will be entered into the Delivery Dialogue as the first default fax number. If there are multiple account payors with Special Fax numbers, the first one in the paystream will be used. 

And with that, the medical documentation is off to the Case Manager, and we can all get back to tiptoeing through the tulips.

This scenario is just one of many that the Special Fax field can be used for. Can you think of other ways to use this field to send out Medical Documents? Let us know in the comment section below.

Contributor: Kylie McKenzie Soder

Monday, June 17, 2013

How to Flag Patients

Problem patients. You know what I'm talking about. We all have them. Those patients that call with medical emergencies, then fail to make their appointments. Then they reschedule and show up 50 minutes late. Those patients! They're flaky and waste valuable time you could be spending helping other, more reliable patients. However, with so many people in the office each day, it's often hard to remember which ones have a pattern of rescheduling/failing appointments.

No worries, there's an easy way to flag them!

In the Rexpert scheduler, a patient's display notes (if any) appear automatically when scheduling a new appointment). Here are some simple steps to add a flagged note for a problem patient which will appear whenever you are scheduling a new appointment.

First, find the problem patient in Account Registration. Here, I will be using Kitty Meowsmith. Kitty has been a baaaaaaaad patient...

On the Main tab of Account Registration, select the Notes button on the right-hand side of the screen:


Once in account notes, select the New button to create a new note. Kitty is often prone to mood swings and anti-social behavior. She's caused a lot of problems in my house... er... office... I meant office.

So now, I'm going to mark her as a problem patient. In the Message field, I write "Often fails appointments; has rescheduled 3x successively." Write whatever will easily remind you of this patient's habits, but be tactful: you never know who may see these notes, since they can be printed on billing/collection reports, etc. Make sure that the Type field is set to Display and that the Red Flag toggle box is checked. Then press Save.


If there are no other display notes, it's a good idea to spread your message over two note lines and red-flag both, because when the display notes pop up in the scheduler, the first note line, even if red-flagged, will be covered with the dark blue selector bar (see the screenshot below).

Now, whenever I set up a new appointment for Kitty, her Display Notes pop up immediately.


Now I will never forget how many problems Kitty has caused me!

Have you ever had any problem cats... uh... I mean patients? Let us know in the comment section below!

Contributor: Kylie McKenzie Soder

Monday, June 10, 2013

ABN Form

What is an ABN form? Formally known as an Advance Beneficiary Notice of Noncoverage, it is insurance, a safeguard, an agreement. Occasionally, Medicare will refuse to pay for a service that it usually covers, or will deem a procedure medically unnecessary or unreasonable. It is in these cases that the ABN form becomes invaluable.

According to the Centers for Medicare and Medicaid Services (CMS) ABN information booklet, when patients fill out an ABN form, it insures that they know, prior to service, that Medicare might not cover their procedures and that they accept full financial responsibility. 

Warning: "If you do not issue a valid ABN to the beneficiary when Medicare requires, you cannot bill the beneficiary for the service and you may be financially liable." (ABN Information Booklet)

There are some things to know about requiring patients to fill out ABN forms:

  • An ABN form must be filled out and submitted before the medical procedure. 
  • ABN forms may not be submitted if Medicare intends to pay for the procedure. 
  • You must be enrolled as a Medicare supplier or provider to use the ABN.
  • The ABN must be verbally reviewed with the beneficiary or his/her representative and any questions raised during that review must be answered before it is signed. 
  • The ABN must be delivered far enough in advance that the beneficiary or representative has time to consider the options and make an informed choice. 
  • Employees or subcontractors of the notifier may deliver the ABN. 
  • ABNs are never required in emergency or urgent care situations. 
  • Once all blanks are completed and the form is signed, a copy is given to the beneficiary or representative. 
  • In all cases, the notifier must retain the original notice on file.


To learn what types of procedures Medicare may not cover, consult the Medicare Coverage Database.

Simple steps to find the most recent ABN form (as of 06/10/2013):
  1. Go to Medicare's website
  2. Once you are on this site, click on FFS ABN in the left-hand selection column
  3. Then scroll to the bottom of the page, and click the first downloads link: Revised ABN CMS-R-131 Form and Instructions.  This is a ZIP file, which will contain a folder with several different files from which you can select.
  4. Choose the 508ABN.PDF and double click it to open it. Note: There is also a Spanish form in the list 508spanishabncorrected.pdf or docx.
You can also download the zip file directly.
What is the most surprising noncovered procedure your practice has dealt with? Let us know in the comments below.

Contributor: Kylie McKenzie Soder

Tuesday, May 21, 2013

About PQRS

Physician Quality Reporting System (PQRS) is an incentive program from the Centers for Medicare and Medicaid Services (CMS), one that encourages physicians to report on the quality of their professional services as opposed to the quantity of their services. This is in an attempt to move medical professionals away from the Fee-For-Service payment structure, the traditional method of payment, toward a Pay-For-Performance (P4P) system.

What does this mean for your patients? The goal of this program is to emphasize the health in healthcare. Instead of always focusing on illness and symptoms, the goal is incentivize keeping healthy people healthier for longer. 

It's understandable that some practices would rather keep to the old Fee-For-Service payment structure. And why not? Why change something that looks like it works pretty well? Why break old habits? Well, according to the CMS website, "Individual eligible professionals who meet the criteria for satisfactory submission of Physician Quality Reporting quality measures data via one of the reporting mechanisms above for services furnished during a 2013 reporting period will qualify to earn a Physician Quality Reporting incentive payment equal to 0.5% of their total estimated Medicare Part B Physician Fee Schedule (PFS) allowed charges for covered professional services furnished during that same reporting period."

If the benefits don't seem like enough of an incentive, there are future consequences for not changing to PQRS. According to the American Medical Association (AMA), in the year 2015, Eligible Professionals (EPs) who do not participate in PQRS and successfully report during the 2013 reporting period will be assessed a 1.5% reduction in all Medicare Fee-For-Service payments. This applies to Medicare Part B covered professional services furnished by the eligible professional during 2015 or any subsequent year.

In 2016, EPs who do not participate in PQRS and successfully report during the 2014 reporting period will be assessed a 2% reduction in all Medicare fee-for-service payments. This applies to Medicare Part B covered professional services furnished by the eligible professional during 2015 or any subsequent year.

Want to avoid these substantial losses? It's easy to start using PQRS. Just follow these simple steps and do it yourself in less than 5 minutes!

1. Go to Settings -People and Places -> Payor.
2. Search under the Payor column for MED (Medicare).
3. Hit the Options 2 tab.
4. In edit mode, check the box that says Bill Zero Balance Charges.
5. Repeat for any other Medicare payors


6. For this step, you may want to contact Client Services for setup help: Go to Settings -> Procedures -> Procedure Maintenance and create a new entry using one of your PQRS measures with a zero dollar fee. (To get started with PQRS Measures, you can view the Implementation Guide on Medicare's Website.)


7.  When you enter Evaluation & Management charges for Medicare patients (such as 99213 for an office visit), enter an accompanying Measure (or Measures) using the appropriate PQRS procedure code(s) created in step 6.  Make sure the diagnosis codes, service date, provider, and location match the E&M code. Each eligible professional must satisfactorily report on at least 50 percent of eligible instances when reporting (through submitting claims) to qualify for the incentive.

There! You're all finished and you can start collecting those benefits in the years to come!

If you are already reporting some PQRS measures and have any thoughts or advice, please share your opinion below under "Post a Comment."


Contributors: Kylie McKenzie Soder and Christine Parker

Monday, May 20, 2013

E-mail Reminders!

Tired of calling your patients to remind them about their appointments? If so, then the Confirm Appointments Via E-mail feature might interest you! Rexpert can send e-mail messages, asking your patients to confirm their upcoming appointments. And it's simple!

Access the Confirm Appointments screen by selecting Scheduling > Confirm Appointments:


Enter the date range of the appointments you wish to confirm. This Rexpert screen lists the names of the patients along with their future appointment dates. To send out a confirmation e-mail, simply select the Confirm Via E-mail button.

Note: If an e-mail address has not been entered in the patient's Account, the button will not be sensitive.


No typing is necessary; the e-mail will be sent out automatically. This is a sample of the e-mail your patients will receive:


Before you can use this feature, some set-up is necessary:
  1. Update your "emailConfirmAppts" document template to be sure the wording is what you want and that your practice logo is included.
  2. Update your locations with a special Billing Number entry so that when your patients click on the "Confirm My Appointment" button in their reminder e-mails, the web page to which they are directed will contain a Google Map focused on the appointment location.
  3. Send us your practice logo (or find a free one at http://all-free-download.com/free-vector/medical-logo.html or http://www.pdclipart.org/thumbnails.php?album=72 or http://www.wpclipart.com/medical/) so that we can put it on the website to which patients are directed.
  4. Make sure your practice has an e-mail address entered and that someone in your office is assigned to monitor this e-mail account daily.
  5. Start entering e-mail addresses in Account Registration.


It will probably be easier to send us an e-mail via the Feedback Button to let us know you want to give this a try: we can quickly do most of this setup for you.


Once the confirmation e-mail has been sent, a record of that e-mail will be noted in two places: 1) the Remark section of the Confirm Appointments page.


2) Under the patient's Appointment Information in the scheduler. (Access this information by going to the scheduler and double-clicking the appointment in question.)

Voila! You're all finished!

Do you find that e-mailing patients leads to better results than calling them? Which option do you find easier when confirming patients? Let us know in the comment section below!

 Contributors: Kylie McKenzie Soder and Christine Parker