Tuesday, September 28, 2010

HIPAA 5010: Plan/Timeline

HIPAA 5010 is an enhanced electronic claims transaction standard. Federal mandate requires all healthcare electronic claim submitters to change from the currently used HIPAA 4010 format to HIPAA 5010 by January 1, 2012.

GVT's Implementation Plan and Timeline:
  • May-Aug 2010 - GVT staff participated in monthly National Provider Calls (phone seminars) conducted by Medicare on the 5010 changes. 
  • Sept-Oct 2010 - GVT software design of 5010 requirements.
Medicare Implementation (direct submissions for PA, NJ):
  • Jan-May 2011
    1. GVT begins testing with Medicare. (Medicare begins to accept tests January 1.)
    2. First wave of GVT practices switch over to 5010 claims.
    3. Remaining GVT practices move over to 5010.
Highmark Blue Shield implementation:
  • Apr-May 2011
    1. GVT begins testing with Highmark Blue Shield.
  • June 2011
    1. First GVT practice switches over to 5010 claims on  June 8,2011.
    2. Additional practices to switch  in week of June 1
  • July 2011        
  •      Remaining practices to switch to 5010.

Emdeon implementation:
  • May-Jun 2011
    1. GVT begins testing with Emdeon.
    2. First wave of GVT practices switch over to 5010 claims.
    3. Remaining GVT practices move over to 5010.
Gateway EDI implementation:
  • Jun 2011
    1. GVT begins testing with Gateway.
    2. First wave of GVT practices switch over to 5010 claims.
    3. Remaining GVT practices move over to 5010.
Medicare Palmetto (Ohio, Delaware, California); PA Medicaid:
  • Jul-Sep 2011
    1. GVT begins testing with Medicare and Medicaid.
    2. First wave of GVT practices switch over to 5010 claims.
    3. Remaining GVT practices move over to 5010.
Aultcare, Carecore, CBH, Magellan, BHSI:
  • Sep-Oct 2011
    1. GVT begins testing with each payor.
    2. When ready, each practice will be moved to 5010.


What will your practice need to do?
It is expected that there will be some Rexpert master table changes required to implement 5010. In 2011, GVT will contact you with directions for these changes and to prepare you for the transition.

Thursday, September 23, 2010

Info on Reconciliation Report

Jim Knott from Client Services has some information to share today. There are times when the reconciliation file offers too little information on a refund requested. To get the complete information, you will need to look at the raw data of the file.

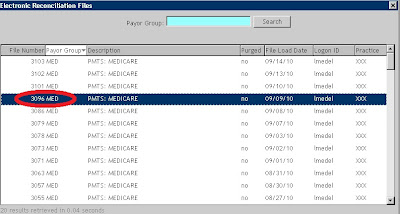
Start out by following the menu path: Patients > Payment Posting > Electronic Reconciliation Rept. Browse until you see the report for the date needed, or press the Get All button and then sort by File Load Date, and find the date you need. Now you can get the File Number:


(Click on any image to enlarge.)

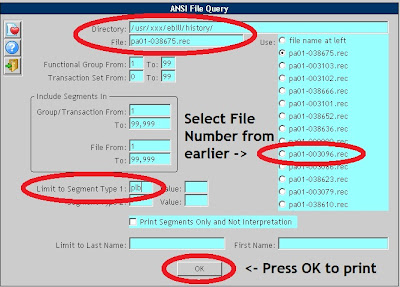
Once you have the File Number (it is a good idea to write it down), navigate to Billing > Electronic > Electronic Support> ANSI File Query. The module opens with the default .clm files loaded on the right of the screen. However, since you need the reconciliation file, change the Directory from the default of "/usr/***/ebill/history/" (*** - your practice code) to "/usr/YYY/ebill/history". (For some users, it will be "/usr/XXX/ebill/history".) Now, the .rec files will load on the right hand side. Select from the available .rec files the File Number of the reconciliation file you found earlier:


In the field Limit to Segment Type 1, type "plb" and hit the OK button. You are now given the opportunity to choose a printer to print the information. The printout will display all available information regarding the reconciliation file:


(Click above to enlarge printout.)

Thursday, September 16, 2010

Search by Policy Number

In response to a question submitted via the Contact Us button, and now also displayed on the "Rexpert User Forum" page here at Rexpert Experience, here is the description of how to search for a patient in Account Registration by Policy Number.

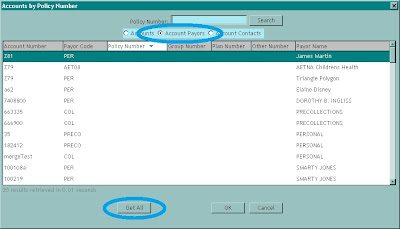
First, enter the Account Registration lookup, and notice the options immediately below the search field at the top of the screen. The default selection is Accounts. Select Account Payors and the screen will change:


(Click on any image to enlarge.)

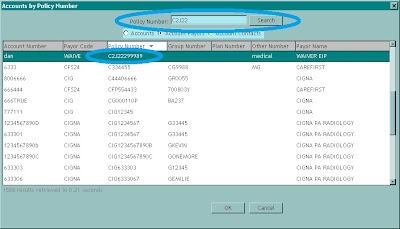
The default search option now changes to Policy Number. Enter the Policy Number and press the Search button:


This is how to search by Policy Number. GVT is constantly receiving new ideas and suggestions regarding ease-of-use and program options, and implementing new features regularly. It is a good idea every so often to pause, take a fresh look at the screens you are using, and see if any changes/options are available that will streamline your usage and make your life easier.

And remember, continue submitting those ideas via the forum and the Contact Us button, for your chance to help improve Rexpert and maybe win some cash! We love to hear from you.

Monday, September 13, 2010

How to Use the Wait List

There have been a few questions recently about the Wait List feature of the Scheduler, so here is a short demonstration of the two most common ways that the Wait List is used.

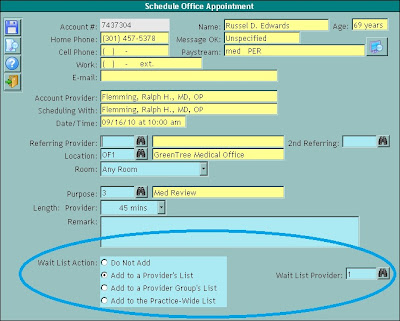
Situation 1: Mr. Edwards came in with moderately severe shoulder pains today (Monday), but Dr. Flemming, his primary provider, has no appointments available until Thursday. This is where the Wait List comes in handy.

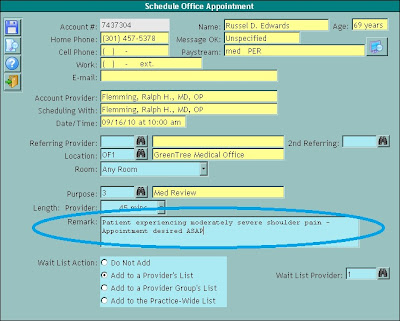
After talking with Mr. Edwards, you decide to schedule him for an appointment on Thursday, but you will also place him on the Wait List in case a spot opens up earlier in the week. While scheduling the appointment, Mr. Edwards indicates that he would prefer to see only Dr. Flemming. Because of this, you choose the Add to a Provider's List option:


(Click any image to enlarge.)

(Note: Mr. Edwards could have been added to a Provider Group Wait List or the Wait List for the entire Practice, and he would likely get an appointment much earlier in the week.)

Now comes one of the most important parts of the process: the Remark. Leave a remark with any valid information regarding the appointment and the requirements for getting off of the Wait List:


This concludes the first commonly used function of the Wait List. When the above appointment is scheduled, Mr. Edwards is automatically added to the Wait List. We'll stay with Mr. Edwards to demonstrate the other most common use of the Wait List.

Situation 2: On Tuesday, another patient calls in and cancels their Wednesday morning appointment with Dr. Flemming. As soon as the appointment is cancelled in the scheduler, an information message appears:


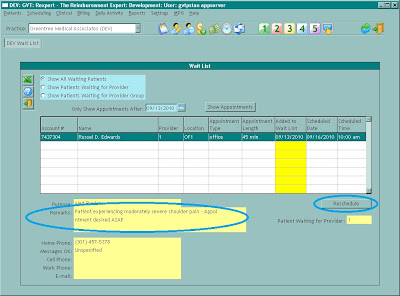
After selecting OK, the Wait List screen appears. Currently, there is only one eligible appointment to fill in the space opened up by the cancelled appointment, and so after reviewing the Remarks and seeing that the appointment requirements match the available slot, you press Reschedule:


This brings up another information message:


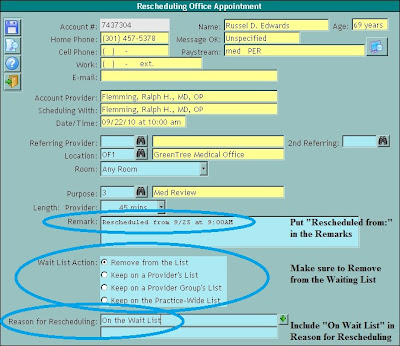
From this point on, you simply follow the steps to reschedule an appointment by dragging and dropping the Reschedule icon into the proper slot on the Scheduler. Once you have selected a slot, the Rescheduling Office Appointment window appears. Make sure to Remove from Waiting List (default) if Mr. Edwards is satisfied with the newly scheduled appointment:


While there are other possible uses, this covers the majority of situations requiring the Wait List. Please comment below if you have questions or comments.