Tuesday, July 30, 2013

ePrescribe

ePrescribe. Many of you asked for it, so we are actively working to include it in the next release. We are partnering with DrFirst, a leading company in electronic prescribing, to incorporate their Rcopia product. Rcopia has won several awards in the past few years including the Surescripts Gold Solution Provider certification.

Now, I bet you're wondering what ePrescribe can do for you. How will switching to electronic prescriptions help your practice?

Three reasons to use ePrescribe:


Patient Safety:
  • Over 7,000 people die every year due to medication errors like illegible handwriting, overdosing from duplicate therapies, and missed drug-related allergic reactions. ePrescribe eliminates human error like handwriting and overlooked information. You will receive warning messages if patients are renewing prescriptions too early or are receiving prescriptions from multiple providers. It even checks allergy information automatically so you don't have to! Let's keep our patients safe by removing the main causes of accidental death.
Green Offices:
  • Did you know that an average of 3,000,000,000 paper prescriptions are written per annum?! That's any where from 25,000 to 36,000 trees a year! That makes, assuming one acre of forest land can support 600 trees, 60 acres of forest used every year for prescriptions! Switching to ePrescribe will eliminate all that paper waste. Wouldn't it be nice to feel like you're helping, not only your patients, but the environment as well?
Efficiency:
  • Here's an age-old story we all know well: a patient comes into the office for a visit and is prescribed a medication upon departure. She takes her prescription to her pharmacy only to find out that her insurance does not cover the medication. What does she do? Does she call her doctor and wait for him to find a medication that's covered, which could take days? Or does she simply pay then and there at a higher cost? Or does she just decide to not take the medication at all, with negative consequences? With ePrescribe, doctors will be able to see immediately what prescriptions are covered by an insurance company. This will save time, and saving time means saving money! 
Amazing benefits right?! But that's not all. Remember our post on PQRS benefits and penalties? As with PQRS, under the Medicare Improvements For Patients And Providers Act (MIPPA) your practice will receive penalties for not switching to ePrescribe starting at a 1% reduction in your Medicare payment, rising to 2% in 2014, and only continuing from there.

So, are you ready to switch? Well, it's easy and affordable! Use your Feedback button to contact Client Services for pricing details.


Contributor: Kylie McKenzie Soder


Thursday, July 25, 2013

Me Pay Prepay!

As an introduction to our third installment in our Co-pay Series, I would like to share a little story:


This is Caveman.
             
              Caveman has a problem...

                            He really wants to get a forehead reduction...

                                                  The procedure is going to cost $5000...

                                                                            And he does not have insurance...


What should poor Caveman do?!

"Me pay prepay!" -Caveman

Caveman goes and sees a doctor who tells him the procedure will cost $5000, which needs to be paid in advance. He decides to go ahead with the procedure and pays the $5000 at the time he gets his surgery scheduled.

Cavewoman, upon seeing her husband’s new small forehead, decides she needs counseling to deal with the change. She does have insurance, but she also has a large deductible that has not yet been met. She decides to have 10 sessions at $100 a session. She pays in cash each time she sees the counselor.

Both of these cases would be entered into the system using Pre-pay.

To enter a prepayment, go to the Scheduler and right click on the patient's appointment. For Caveman it would be the date of the scheduled surgery, and for Cavewoman it would be the date of the counseling session. From the list of options, select the Co-Pay button (remember when we did this last week?...):


When the Co-Pay window appears, select the Prepay option. Enter the desired sum into the Amount field, select a Method of payment, and add a Note if you choose. In the case of Caveman, you would not want to enter a Procedure Code, because there could be several codes with a large procedure like a forehead reduction. However, a procedure code would be useful in the case of Cavewoman since she may have two charges for each visit: a counseling session which her insurance will not cover (and to which the prepayment should be applied) and a medication management charge which insurance will cover (and should be left open for the eventual insurance payment).


Note: It's easy to confuse Prepay and Other Amount. The main thing to remember is that Other Amount applies funds to the co-pay and the personal balance. Patients that do not have insurance or haven't met their deductible may not have a co-pay or a personal balance. This is why we use prepay.

Once you select the OK button. you will be prompted to choose a printer for the receipt. It's as simple as that.

The pre-paid money will be applied to a special $0.00 pre-pay charge.  When any charge matching the patient, date of service, and procedure code (if entered) becomes due from the PER payor, the money will be automatically transferred from the pre-pay  charge to the new charge.

I hope you have enjoyed our series on Co-payments and Pre-payments. Post any questions in the Comment section below or contact us via the Feedback button.

Contributor: Kylie McKenzie Soder

Tuesday, July 23, 2013

Co-pays in Scheduler

Hey, remember last week's post, Co-Pays for Days? Well, here is the second installment in our series on co-pays. Now that you know the basics of how co-payments work, it's time to put them to use in the Scheduler.


Once in the Scheduler, right-click any appointment to display the Right-Click Appointment Menu. There are several useful options on this menu, but for the purpose of this blog, we will be looking at the Co-Pay option:


This option opens a new window with five methods of payment for the patient: Co-pay, Personal Balance, Co-pay + Personal Balance, Other Amount, and Prepay.


This post will cover the first four options. There will be a post completely dedicated to prepays on a later date.


The first option is the most common in our series on co-pays. When this option is chosen, the Amount field will default from the Account Payors screen in Account Registration. This amount can be changed if it is incorrect or the patient is paying only part of it.

The second option, Personal Balance, includes anything from Personal, pre-collections, and collections. This amount is a sum of the balances of all the qualifying charges, so it cannot be changed here.  The idea is that when you ask a patient to pay the co-pay, you can also try to collect any personal balance outstanding.  This amount will only include charges which have completed their insurance billing.

The Co-pay + Personal Balance option simply adds the default co-pay amount to the Personal Balance total. Just like the Personal Balance amount, this amount cannot be changed here, and includes only charges which have completed their insurance billing.

The final option is called Other Amount. This option is a little bit more interesting. Any amount entered via this option will first go towards the Co-Pay amount, and then anything remaining will go towards paying off the Personal Balance amount.

Post any questions in the Comment section below and be on the lookout for next week's post on Pre-pays!

Contributor: Kylie McKenzie Soder


Wednesday, July 17, 2013

Co-Pays for Days

This week, we’re going back to the basics… and I mean really basic. This post is an overview of co-pays. For those experienced in the medical world, this post might not seem very useful. However, it is my goal to provide useful information to those just starting out. Also know that this is the first post in a series about posting co-pays and pre-payments, so reviewing this information may be beneficial.

Health insurance is defined by Investopedia.com as “A type of insurance coverage that pays for medical and surgical expenses that are incurred by the insured.” If health insurance were that simple, this world would be a lot less stressful. It’s not that simple, however, and although insurance companies are there to insure coverage, they are still businesses, and the aim of any business is to make more money than they lose.

So, a patient finally gets coverage. He does everything right, he pays his insurance premiums, he tries to avoid accidents. Even after all this, the day comes when a trip to the medical office is unavoidable. Think he’s completely covered for any procedure? Think again. Once in the doctor’s office, there are three more methods the insurance company can use to get him to pay.

The first method is called a Deductible. This means he has a predetermined amount he must first pay out of pocket before the insurance company will cover expenses. It’s part of the deal a patient makes with his insurance company. If the patient has a lot of medical procedures, that's a lot of money for the insurance company to pay per year. So, the company first gives the patient a set amount for the year that he has to pay off all by himself (let's pretend that's $2000). This $2000 is the deductible. Once the patient pays $2000 out of pocket for various medical procedures or medications, the co-pay and co-insurance agreement will go into effect.

To explain this better, here’s an example: many coffee shops have punch cards. (You know, buy ten drinks and get the eleventh free, that sort of thing.) This is very similar to a deductible. The insurance company/coffee shop agrees that, if you pay for fifty caffeinated drinks out of pocket, every drink after that will be completely free for the rest of the year. Even if you buy an eight dollar drink, if the deductible has been met, the coffee shop will pay for it completely.

As medical expenses have risen, so have deductibles. Some patients pay a $2000 deductible a year or more! Many family deductible plans can be anywhere from $7500 to $10,000 a year.

Alright, our patient finally paid his deductible. Now do you think he’s covered 100%? Nope! The second method an insurance company uses is called a Co-pay or co-payment. Once the deductible is met, the insurance company agrees to pay for medical expenses as long as the patient pays a fixed amount for each office visit. This small amount is the co-pay. This is not a percentage of the fee, but a fixed cost, often ranging from $15-$50. So, in other words, it doesn’t matter how much the office visit costs, the patient's co-pay amount will stay the same.

Make sense? It's kind of like going to a buffet: you pay $7.95 no matter what you eat. You could get the kale salad. Or the sweet and sour pork. Or both! You could eat $50 worth of food, but all you would have to pay is $7.95.

Something to remember is that a co-payment is only made once. Even though there may be several charges during an office visit, the patient does not make a co-pay for each charge. The patient makes a single co-payment the moment he enters your office, despite the extent of the services rendered. Going back to the buffet scenario; you can go back and get food several times during your visit to the buffet, but you only had to make the one payment upon entering the restaurant.

Alright, so we covered deductibles and co-payments. However, there is one more thing we should cover, and that is Co-insurance. Not every medical procedure is completely covered by an insurance company. Insurance will often cover 100% of “preventive” procedures, things like colon cancer screenings, vaccines, and annual check-ups. For all other procedures, there is co-insurance. Depending on a patient’s plan, the insurance company will only cover 50-80% of the allowed charges for all other procedures. (Note: if a provider participates in an insurance company's plan, the insurance will only allow a certain maximum amount to be charged, depending on the procedure code.  Any difference must be adjusted off.)

So, now, let’s go back to the buffet example. Having met your deductible, you only pay $7.95 to choose from the buffet. After eating various types of food, you see the desert menu and a delicious piece of pie strikes your fancy. However, any item on the desert menu is not included in the price of the buffet. The pie slice is priced at $5.00 for any customer who comes in and only orders that slice. For you, though, that delicious morsel would only cost $3.00. Why is this? Since you paid $7.95 for the buffet (meaning that you are enrolled in an insurance plan) the restaurant (meaning the insurance company) will pay for 40% of that slice of pie, leaving you to pay the remaining 60%.

So those are the basics of co-payments. See, not so difficult! In fact, I'd say it's as easy as pie...

Mmm... pie...


Disclaimer: Please remember that while these scenarios are usually the way deductibles/co-pays/co-insurance work; there are always variations and exceptions.

Keep a look out in the next few weeks for a post about Co-pays in Rexpert. Any questions about co-pays? Leave those questions in the Comment section below so they can be answered in the next post!


Contributor: Kylie McKenzie Soder

Tuesday, July 9, 2013

iRexpert? I like!

Picture this: you're stranded all alone on a desert island and you have no food or water. All you have in your hand is an iPad. Somehow, mysteriously, you have a perfect internet connection. What can you do? You can connect to Rexpert!

Okay, so maybe that's not the best solution for a desert island scenario. But for other emergencies (you're on vacation, you're in a meeting, your daughter would kill you for missing another band recital...) it would be very helpful to connect to Rexpert through your smartphone or tablet. Emergency is the key word here: you can connect to Rexpert through your tablet, but it will be tedious and cumbersome to use, since it is meant for a device with a regular keyboard and mouse. However, if there is a question about your month-end reports which needs to be answered immediately, you can at least look up relevant data and run reports to the screen.

To start, make sure your device has an active internet connection. Warning: know your data plan! Wifi is usually free, but constant 3G/4G usage may be expensive. Once you are connected, open the AppStore (for Apple devices) or Play Store (for Android devices) and search for "2X Client". Select the app 2X Client RDP/RemoteDesktop.

To add to its convenience, this app is completely free! All you have to do to download it onto your device is click the Free button and then click it again when it changes to Install.


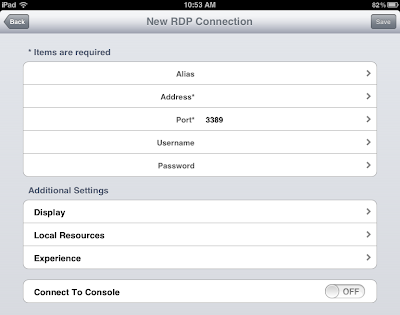
Once the app has finished loading, click it to start setting up your remote connection. Select the "+" sign to add a new connection. When the New Connection screen appears, select the RDP Connection button NOT the 2X Connection button.


Click the Alias field and enter "Rexpert". For the Address field, enter your assigned Rexpert IP address. After you enter the address, accept the default value in the Port field. Enter your Rexpert Username and Password, then hit the Save button in the upper right-hand corner.


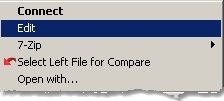
Note: In case you have forgotten, there is an easy way to find your assigned IP address and Rexpert ID. Right click your remote desktop icon and select Edit:


A new screen will appear that contains a Computer field and a User name field. The number in the Computer field is what you will enter into the Address field in 2X Client. The User name, which should include both your machine's name as well as your Rexpert ID, is what you will enter into the Username field in 2X Client. For the Username, be sure not to mistake "\" for "/":


After you hit Save, you will automatically be taken to the Connections screen. You will see that your Rexpert connection has been saved there. And there you have it! Selecting that connection will take you directly to your Mobile Rexpert where you log in as normal.


When you log in, do NOT not save your password. If someone else steals or "borrows" your tablet, you will be compromising huge amounts of protected personal information.

Any questions? Problems creating a new connection? Contact Client Services via the Feedback button or post your question in the Comment section below!

Contributor: Kylie McKenzie Soder


Monday, July 1, 2013

Interface Status

Warning! This post may not be for all users. Viewer discretion is advised. This post is rated:


The Stop/Start Interfaces screen has been updated with a new feature: the Check Interface Status option!

Settings > Tools > Stop/Start Interfaces


There may come a time when documents fail to send... when we are unaware of disconnected interfaces... when important messages go unnoticed... But that is not this day!
This day, we check our status!


With this new and improved update to the Stop/Start Interfaces screen, you can now check the status of your practice's interface with other systems such as Infinitt, Talk Technology, Medquist, etc.

To do this, first select the correct Interface from the drop-down menu. Then select Check Interface Status from the Action radio set. Note: the Command field will fill in automatically. If it does not, or if you do not see the interface whose status you wish to check, use the Feedback button to ask the Development Team to set this up for you. Lastly, select Begin. Information regarding the status of your interface will appear in the large yellow box at the bottom of the screen.


This option is not available for all users. If you think this feature would be beneficial to your practice, contact Client Services via the Feedback button.

Contributor: Kylie McKenzie Soder