Monday, July 25, 2011

Defaults in Certain Screens

Setting Screen Defaults is an excellent way to make it easier to print, view schedules, or anything else where you see the Defaults icon. You can select the report type, dates, and codes once, instead of having to type them in every day or week.


Log in to Rexpert and open the program for which you want to set defaults; this blog post will focus on setting screen defaults for the Daily Schedule. Open the Daily Schedule Options by navigating to Scheduling->Reports->Daily Schedules.

From here click on the Defaults icon located on the left-hand side of the screen.


Click Yes to update the screen defaults for your account. All fields that are blue will have the contents saved as the defaults, except for the date and (for other screens which contain them) fiscal period fields.


Click Yes if you want to update your Screen Defaults with default dates as well. You will almost certainly want to do this. Each date on the screen will be brought up one at a time so that you select its default value.


Clicking Yes will present you with a list of options for how the date is to be handled. The list of options can be set or skipped for each date field.
These options include:
  • No Default
    •  No default is saved. Any date entered into the date field is not saved when the Daily Schedule Options window is closed.
  • As Entered
    • The date you have entered when you save the Screen Defaults. Any date entered after this is not stored, you'll have to set new defaults to set a new date. 
  • Manual
    • A custom date that you can enter while setting the Screen Defaults. Again, this date doesn't change.
  • Yesterday
    • Yesterday's date for whatever the current date is. For example if today is August 1, this date will default to July 31. If you run the report a week later, on August 8, it will default to August 7.
  • Today
    • Today's date for whatever the current date is. For example if today is August 1, this date will default to August 1. If you run the report a week later, on August 8, it will default to August 8.
  • Tomorrow
    • Tomorrow's date for whatever the current date is. For example if today is August 1, this date will default to August 2. If you run the report a week later, on August 8, it will default to August 9.
  • First Day Of
    • The first day of either the last week, last month, last year, current week, current month, current year, next week, next month, or next year.
  • Last Day Of
    •  The last day of either the last week, last month, last year, current week, current month, current year, next week, next month, or next year.

Click OK when you have selected the appropriate setting for the date field (it will ask you to pick a setting for each date field).
Click OK when your defaults have been saved.


Setting up Screen Defaults is an easy way to save you time throughout the day. While this blog post focused on setting the defaults for the Daily Schedule, this post can be applied anywhere you see the Defaults icon.

Wednesday, July 20, 2011

Mobile Scheduler: How To

Using the web, you can now keep track of your schedule when you’re away from your office. We've designed a site especially for smartphones and tablets. The REXPERT Schedule Review via Web Browser facility has been tested on various devices including several Android smartphones, the Motorola Xoom (an Android tablet), the Apple iPad, the Apple iPhone, and the Apple iPod Touch. You can also access it from any standard computer, using a browser such as Firefox or IE!


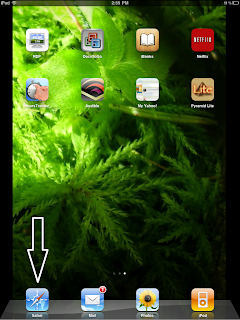
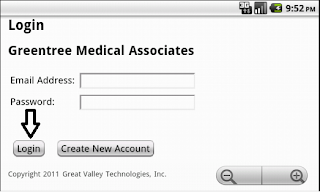
To view your schedule, start by tapping the web browser icon. On Android smartphones this icon is usually located at the bottom of the home screen. On the iPhone this icon is labeled Safari and is located in the bottom left hand corner of the home screen. Log into the website using your user name and password, and click Login. [Hint: you can also press “Go” or “Submit” on the screen keyboard after typing your password to make the process one click faster.]


                    On Android 2.2                                                  On the iPhone


By clicking on the Login button, your schedule for the current day is presented to you. This is your schedule exactly as it is in Rexpert at the present moment. If a new appointment is scheduled and you refresh your screen, you will see the change right away. The schedule is not uploaded to your phone, but presented dynamically, reflecting changes as they occur throughout the day. Your appointments are arranged in chronological order. From the initial display, you can navigate from day to day using the  Previous, Today, and Next buttons. Clicking the Logout button will log you out of the website. Make sure you logout of the website if you are on a public computer.

Your scheduler is displayed using a secure site (https). However, think twice before accessing it via a public wi-fi system (rather than your phone's service provider). If you would feel uncomfortable accessing your bank web site in any given situation, you should probably not access your schedule either. Please visit How to Stay Safe from the PCWorld Business Center for more information.

On smartphones, like Android or the iPhone, you can call a patient by tapping the phone number on the screen. On Android smartphones, a short tap will bring up the dialer and from there you can press the Call button.


A long tap will bring up a list of options that include: Dial, Add contact, and Copy.


The iPhone has similar functionality.


If you would like to start using this new feature, please e-mail us at
guidev@practice-alt.com or contact us through the feedback button on the main Rexpert window and we will set you up with a login and password.

Monday, July 11, 2011

Easy "End" in Account Notes

Getting to the end of Account Notes can take a while when there are hundreds of notes. Get quickly to the last note using this one Weird Old Trick (and no, you don't have to sign up for three free offers first): the End key.

The location of the End key differs depending on the style of your keyboard, but normally it is located just to the left of the Page Down key. Pressing the End key will navigate to the last Account Note for that patient, and pressing the Home key will navigate to the first.

Hit the End key, it's really just that simple.

Thursday, July 7, 2011

Search Using Lookup Button

Recently, some of you have been asking questions regarding lookups and their use.  GVT has added some new features to lookups over the last few releases, so here is a short demonstration of some of the standard ways that lookups are used.  Because of the many searching options in the Account Lookup, it will be the focus of this post.

To access the Account Lookup, press on the binoculars next to the Account Number field in Account Registration:

(Click any image to enlarge.)

The Account Lookup opens.  Notice the default search option is for accounts on a last name, first name basis. This means it is possible to search for patients by simply entering in all or part of their names:

(Information has been censored which may be used to identify the fictional* patients used for demonstration purposes.)

Now, take a look at the general design of the screen.  There are four separate elements on this screen.  The most important element on the screen is the browse itself, where the patient information is shown.  Next, the column headers along the top of the browse are very useful.  For example, to search by Medical Record Number rather than by Last Name, First Name, simply click on the Medical Record Number column header:

(Information has been censored which may be used to identify the fictional* patients used for demonstration purposes.)

Notice the Get All button at the bottom of this screen.  Anytime you see this button, you are only dealing with a portion of the account records.  In order to access all accounts at once, press the Get All button.

At first glance everything appears to be the same.  However, underneath the browse in light gray letters is displayed the number of patient accounts found, and the amount of time it took to retrieve them.  Notice the comparison between the numbers before and after pressing Get All:

The more patient records your practice has, the longer the Get All feature will take.  The information for all of the patients seen by your practice, often numbering in the hundreds of thousands, has to be copied from the computer which stores the data to the memory of the computer showing the lookup.  The more often you look up patient information by retrieving all accounts, the more you slow down your session.  Accessing thousands of entries every time you attempt to look up one patient is not necessary.  It is almost always possible to find the account you are looking for more quickly by simply using the search feature.

(Note: An exception is when you need to search by Phone Number.  For all other columns, click on the column header and then enter the info into the Search field and find the account that way.)

Sometimes you don't have any patient information, and only have a subscriber policy number or the name of a parent or spouse.  This is where the other two options immediately under the search box can be lifesavers!


The general functions of all other lookups found in Rexpert are the same as for the Account Lookup.

* All patient names displayed are fictional. Any similarity to actual persons, living or dead, is purely coincidental.